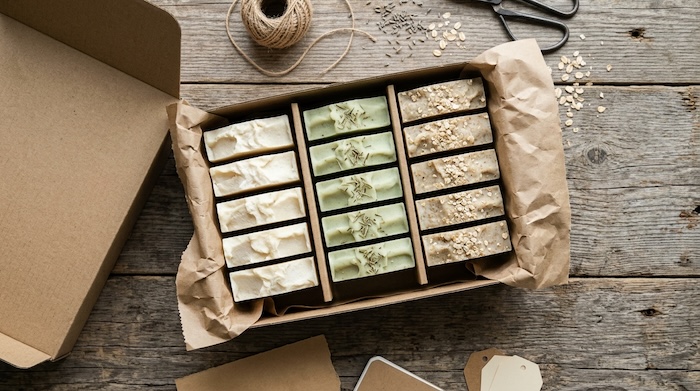
Handmade soap is a wonderful alternative to commercially manufactured soap, but it does need a little extra care to keep it looking and performing its best.
One of the most important things to remember about handmade natural soap is that it needs to breathe. Proper storage helps prevent your soap from becoming soft, sticky, or mushy, and can make a big difference in how long each bar lasts.
Whether you’ve just purchased a few bars of handmade soap or made a fresh batch yourself, these simple soap storage tips will help keep your bars in good condition.
So You’ve Bought Some Handmade Soap!
Congratulations! Once you’ve tried a good bar of handmade soap, you may never want to go back to store-bought soap. But knowing how to store and care for it properly will help you enjoy every bar for longer.
Why Does Handmade Soap Need to Breathe?
Handmade soap, particularly cold process soap, contains naturally occurring glycerin. Glycerin attracts moisture from the surrounding air, which is one reason handmade soap can sometimes develop a damp or sticky surface in humid conditions.
Freshly made cold process soap also needs time to cure. During this process, excess water gradually evaporates, helping the bars become harder and longer-lasting.
If you’re making your own soap, my guide to How Long Should Handmade Soap Cure? explains why curing time matters and how to know when your bars are ready.
Once your soap has cured, proper storage will help preserve its quality until you’re ready to use it.
How to Store Handmade Soap Before Using It
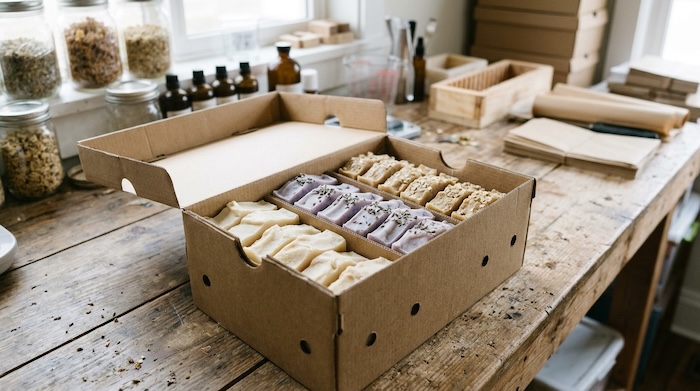
If you’ve purchased several bars of handmade soap or made a large batch, you’ll want to store the extras properly.
Here are a few simple tips I use when storing my own handmade soaps.
1. Store Soap in a Cool, Dry Place
Choose a storage area away from excess moisture, humidity, and direct sunlight.
A bedroom closet, linen cupboard, or dry storage shelf can work well.
Avoid keeping unused soap in a damp bathroom, especially if the room gets steamy after showers.
2. Use a Container That Allows Air Circulation
I like using ordinary cardboard shoe boxes for storing my handmade soap.
They’re inexpensive, easy to stack, and allow some air circulation. I usually add a few holes to the boxes so the soap can breathe.
You can also use cardboard boxes with dividers or open shelving.
I prefer not to use airtight plastic tubs, especially for freshly made soap. Trapped moisture can cause bars to develop a damp or sticky surface.
If you’re using plastic containers for cold process soap, make sure the bars are fully cured and completely dry before storing them. I prefer ventilated containers because they help prevent moisture from becoming trapped around the soap.
3. Keep Handmade Soap Out of Direct Sunlight
Natural soap colours can fade when exposed to sunlight.
Heat and direct sunlight may also affect the appearance and fragrance of your soap over time.
Keeping your bars in a cool, shaded location will help preserve their colour and scent.
4. Store Similar Soap Scents Together
This is something I’ve learned from storing different batches of handmade soap.
Strong fragrances can transfer between bars when they’re stored close together for long periods.
For example, a peppermint soap stored beside a lightly scented lavender soap may eventually take on some of the peppermint fragrance.
I like to keep similar scents together or separate strongly scented bars with paper or cardboard dividers.
How to Make Handmade Soap Last Longer in the Shower
One of the biggest complaints people have about handmade soap is that it sometimes seems to disappear quickly in the shower.
The good news is that a few simple changes can help your bars last much longer.
1. Always Use a Draining Soap Dish
This is probably the most important tip I can give you.
Never leave handmade soap sitting in a puddle of water.
When soap sits in water between uses, it gradually absorbs moisture, softens, and becomes mushy.
A good soap dish should have raised ridges, drainage holes, or slots that allow water to drain away and air to circulate around the bar.
You don’t need an expensive soap dish. Even a simple plastic or wooden one can make a big difference.

Soap Dishes to keep your soap out of water

2. Keep Soap Away From Direct Shower Spray
Try to position your soap dish somewhere that isn’t constantly being sprayed with water.
A shower shelf away from the showerhead or a draining soap holder attached to the wall can work well.
The less time your soap spends wet, the longer it will generally last.
3. Allow Soap to Dry Between Uses
After using your soap, place it back on a draining dish where air can circulate around it.
If several people are using the same bar throughout the day, it may not have enough time to dry completely.
Keeping an extra bar available can help each bar dry between uses.
4. Use a Soap Dish That Drains Properly
These inexpensive soap dishes are great for the shower.
They have little raised nubs that keep the soap off the bottom of the dish, along with drainage holes that allow water to run away.
InterDesign Plastic Bar Soap Holder for Bathroom Shower – Set of 3, Clear
Why Does Handmade Soap Sometimes Sweat?
Have you ever noticed little beads of moisture forming on the surface of your handmade soap?
This is sometimes called soap sweating or glycerin dew.
Glycerin is a humectant, meaning it attracts moisture from the air. In humid conditions, this moisture can collect on the surface of the soap.
It’s particularly common with some melt-and-pour soap bases, although other handmade soaps can also become damp in humid environments.
To help prevent soap sweating:
- Store unused soap in a cool, dry location.
- Avoid humid bathrooms and damp storage areas.
- Keep cured cold process soap away from excessive moisture.
- Use appropriate packaging for melt-and-pour soap, which may require airtight wrapping to prevent glycerin dew.
A little moisture on the surface doesn’t necessarily mean your soap has gone bad, but proper storage will help keep your bars looking their best.
Can You Store Handmade Soap in Plastic?
It depends on the type of soap and whether it has finished curing.
For freshly made cold process soap, I recommend allowing plenty of airflow during the curing period rather than sealing the bars in plastic.
Once cold process soap has fully cured, it can be packaged for storage, although breathable packaging is often a good choice in dry conditions.
Melt-and-pour soap is different. Many melt-and-pour bases benefit from airtight wrapping once they’ve cooled and hardened because this helps prevent moisture from collecting on the surface.
The important thing is to choose storage and packaging that suits the type of soap you’re making.
Make Your Own Soap Dish
You don’t necessarily need to purchase a soap dish.
If you enjoy simple DIY projects, you can make a decorative soap dish using small stones or pebbles.
The stones raise the soap above the bottom of the dish, helping keep it out of standing water. Just make sure the dish allows water to drain or that you empty it regularly.
Here’s a creative idea for making your own soap dish:
DIY Soap Dish Using Rocks – Mother Earth Living
Frequently Asked Questions About Storing Handmade Soap
How long can handmade soap be stored?
Properly made and cured handmade soap can often be stored for a year or longer, depending on the oils, additives, fragrance, and storage conditions. Some soaps develop rancid spots or lose fragrance sooner than others.
Should handmade soap be stored in the refrigerator?
Generally, no. A cool, dry cupboard is usually a better choice. Refrigerators can introduce moisture and condensation when soap is removed.
Can I store different handmade soaps together?
Yes, but it’s best to keep strongly scented soaps separate from lightly scented or unscented bars to prevent fragrance transfer.
Why does my handmade soap get mushy?
The most common reason is prolonged contact with water. Using a draining soap dish and allowing your soap to dry between uses will help prevent this.
Should handmade soap be wrapped in plastic?
Fresh cold process soap should not be sealed in plastic while curing. Fully cured soap can be packaged, while melt-and-pour soap often benefits from airtight wrapping to prevent sweating.
Final Thoughts on Caring for Handmade Soap
Handmade soap doesn’t require a lot of special care, but a little attention to storage can make a big difference.
Keep your unused bars in a cool, dry place, allow freshly made cold process soap to cure properly, and always use a draining soap dish in the shower.
With proper storage and everyday care, you’ll get the most out of your handmade natural soap, and your bars will last much longer.
Once you get into the habit of keeping your soap dry between uses, you’ll find it’s a simple way to enjoy every last bit of your handmade soap.
© 2018 – 2026, Tes. All rights reserved.
I have always wondered what to do about my handmade soap that seemed to disappear so quickly. Thank you so much for your tips! It makes sense that the soap needs to breathe and be stored in a dry place. I’m thinking of trying to make my own soap. Can I add essential oils? Will that also cause a “weepy” soap?
Hi, some handmade soap will disappear quickly some because of the oil combinations used and some because of improper storage or use. You can certainly add essential oils to your soap, they will not cause it to weep. You may want to have a look at this page when deciding what to add for scent Scenting soap
Ok. I didn’t know soaps could take on the scents of others when stored together. But I had some difficulties trying to use soap dishes. This one you are recommending on your website, does it have some sort of a collector underneath? My experience with these soap dishes is that I always have to do some clean up of the bathroom after use, since the wet soap will continue to spill underneath, leaving traces all over.
I had to find an alternative, a small plastic container, which really solved the problem completely, as my wet soap will not soil my soap stand anymore. But it would be more fashionable using a soap dish with a collector under, than using a plastic container. Do you have a recommendation for this type of soap dish?
Hi, when I use this soap by the sink I put the soap drainer into a soap dish to collect any moisture. If soap is made well and is cured long enough you will not get any soap slime if the water drains off.
I haven’t bought any handmade soap bars but I’ve seen quite a bit of them and I’m gravitating towards buying one. Now I know that I can’t just let it sit in my shower when I do buy one. I like the idea of the soap dish because it can still sit in my shower but because of the holes the water won’t stay on the actual soap.
Hi Victor, handmade soap is so nice, you’ll never go back to that store bought stuff lol. I use the dish shown on this post and it works very well in the shower or sitting by the sink in a soap dish.
I love handmade soaps so this post was especially good. I love giving homemade soaps as gifts.
I know what you mean about needing air circulation. Nothing worse than ruining a lovely bar of homemade soap by letting it get mushy! I try to keep mine elevated on a breathable surface like those that you’ve mentioned.
I’m going to look at some of the recipes you’ve posted, too. So many of these would make great small gifts, too. I’ll let you know if I have a chance to try some of them. Thanks!
Thanks Cheryl, I would love to hear back from you once you’ve made your soap. Happy Soaping
Never thought about the fact, soap needs to breathe. And must be stored properly, in a dry place. Thank you for the information. I wonder if it needs to be stored in a dry place and should be washed off thoroughly before each use, I easily wondering if soap develops mold on it if not stored properly? Also, van a soap cause skin ailments if its not properly used or stored?
Homemade soaps feel better on the skin, like a natural application compared to shower gels, even better than Oil of Olay products. I love all natural homemade, handmade products. Lakesha
I have never seen soap develop mold, I think it would be very unlikely although some soaps if not stored properly or have been made with too much of one oil or the other can go rancid. You will see orange spots on the soap if this has happened and sometimes it will be a little sticky to the touch.
Homemade soap does feel wonderful on the skin and can help with many skin ailments. I don’t think incorrect storage would cause skin irritation. It still has the same good oils in it.
Handmade soap is just an incredible discover if you’ve never tired it. I went back to it last year and there is no comparison to store bought. Another example of how we forfeit quality for convenience.
I remember as a boy when my grandmother would make her hand made soap. She made a big deal when it was time to use the lye…and it scared me to death. I thought if I got to close to the process my face my melt off. I guess she just wanted us to respect the chemical reaction going on. I remember taking bath with that soap as a youngster and they were bug white bars…I mean huge!
When, on the rare occasion, I got my mouth washed out with soap I remember how unpleasant it was due to the strength.
I’m glad both parenting tactics and soap making has change since then.
Thanks for sharing your soap story with your Grandmother, some of those soaps were lye heavy back then and the bars were a little harsh. Thankfully we have learned a lot since then. As for the lye, I can see that. My grandkids are not allowed anywhere near the soap room when I’m mixing the lye.
I really like to use handmade and/or homemade soaps … For many reasons …
First of all, they have “character” … well, most of them …
And the main reason: as you said, usually they contain natural glycerin and vegetable oils, and I’m firmly convinced that they are more “healthy” than the vast majority of all those scientifically developed super-branded soaps.
And now I’ve learned that they need to breathe … Thanks!
Your right handmade soaps are better than most of the super-branded soaps on the market. The natural glycerin in handmade soap adds so much moisture where as most soap bars bought in the grocery store contain little to none as it has been removed and sold as a byproduct.
The article, “Handmade soap storage and care,” is really an eyeopener for me. I did not know that soap needs to breath. However, your explanation of the importance of soap to breath makes sense to me. Compared to stored bought soap, homemade soap with it’s natural glycerin and vegetable oils is actually a gem.
I also find your 5 tips to prevent soap from dissolving in the shower or to deteriorate on the shelf in particular helpful.
In future I personally will bear in particular the following tips of yours in mind, namely store my unused soap in a covered container that has openings so the soap can breath, don’t store similar scents together, use a soap dish with slots to enable soap to dry between uses and keep stored soap out of direct sunlight.
From now on my soap bars will definitely last longer. Thank you Tess for your valuable information.
I’m glad you have found this information helpful, now you can enjoy longer lasting soap bars 🙂
Great advice on storing handmade soap! I didn’t realize how important airflow is for keeping bars hard and long‑lasting. Thanks for the helpful tips.