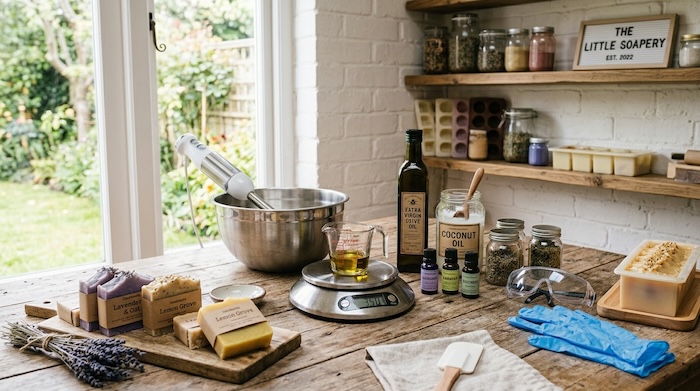
Cold Process Soap Making: A Beginner’s Guide

Making soap from scratch might seem daunting at first, but it’s a rewarding craft that combines art and science. I’m here to introduce you to cold-process soap making, a method where you control every ingredient that goes into your soap, resulting in a high-quality product that’s gentle on the skin and better for the environment.

Unlike the bars you find at the store, handmade soap retains natural glycerin, offering extra moisturizing properties. Plus, imagine the personal satisfaction you’ll get from using a bar of soap that you created with your own hands. Whether you’re looking to avoid harsh chemicals, reduce plastic waste, or just embrace a new hobby, cold-process soap-making is a fulfilling endeavor.

The process allows for endless creativity. You can choose colors, shapes, fragrances, and textures to suit your tastes or meet specific skin care needs. But before visions of lavender-infused, swirl-patterned soaps start dancing in your head, it’s crucial to ground ourselves in the basics of safety and precision. Soap making is a precise art that requires respect for the ingredients, especially lye, a key component that turns fats into soap.

Historically, soap making is a centuries-old craft, but it’s experiencing a modern revolution as people seek more control over the products they use daily. There’s a deep sense of community and tradition in the soap-making world, and I encourage you to become part of it.

Understanding the origins of soap and the chemistry behind it provides a strong foundation for your first batch. In the next section, I’ll walk you through the essentials you’ll need to get started. You’ll see it’s not just about gathering materials; it’s about embarking on a journey back to basics—a journey that performers, pioneers, and pragmatists can all appreciate. So let’s ensure you have everything you need to turn your kitchen into a mini soap-making lab.

Gathering Your Cold Process Soap Supplies

I always say soap making is both an art and a science. To dive into this craft, you need the right tools and ingredients. Think of it as gathering a painter’s palette and brushes before starting a canvas. Here are the essentials you’ll need for cold-process soap making:

  • Begin with the foundation: fats and oils. Depending on the properties you want your soap to have, you’ll choose different types. Coconut oil for lather, olive oil for moisturizing, and palm oil for hardness are some popular choices. Consult a soap-making oil chart to understand the unique benefits each oil brings to the table.
  • Next, let’s talk about lye, scientifically known as sodium hydroxide. It’s the chemical that, when combined with oils, results in soap through a process called saponification. A word of caution: lye is caustic and must be handled with respect. ALWAYS use 100% pure lye and adhere strictly to safety guidelines to protect yourself.
  • Regarding safety, invest in goggles, gloves, long sleeves, and a well-ventilated workspace. I cannot stress enough how important it is to protect your skin and eyes. Lye can cause serious burns, so equipping yourself with safety gear is non-negotiable.
  • Lastly, source high-quality and sustainable ingredients. Local suppliers might offer fresh, organic options. Online retailers specialize in soap-making supplies too. Don’t forget molds – silicone works best as it’s flexible and easy to clean. A sturdy blender, thermometer, and precise scale are also indispensable. Remember, accuracy is key to great results.

The Soap-Making Process: Step by Step

Starting the soap-making process might seem daunting at first, but I assure you, with the right guidance, it’s utterly rewarding. Here’s a breakdown of what you’ll be doing.

  1. First up is the preparation stage. Have all your supplies laid out and your workspace clean and clutter-free. Safety first – put on your gloves and goggles.
  2. Begin by accurately measuring the fats, oils, and lye using a reliable scale. Precision is critical here to ensure a successful chemical reaction called saponification. Missteps could result in a failed batch or even a hazardous mixture. Once your lye water is mixed, allow it to cool slightly while you gently warm your oils until they’re about the same temperature. The ideal range is around 95-110 degrees Fahrenheit.
  3. Now, you’ll slowly combine the lye water with the oils. This step needs a careful and steady hand. Gently stir the mixture, or if you’re using a stick blender, pulse it to mix. This is the ‘trace’ stage, where your mixture starts to thicken, akin to a light pudding. Here’s the fun part. Want to add some flair? This is the moment to mix in any chosen fragrances, colors, or add-ins like oatmeal or poppy seeds.
  4. Pour the thickened soap mixture into your mold. Tap the mold gently to eliminate any air pockets. Then cover the soap with a towel to insulate and encourage the saponification process. In about 24 to 48 hours, your soap should be set enough to remove from the mold, but not quite ready for use yet.
  5. After unmolding, you’ll move into the curing phase. Curing can last for four to six weeks and is necessary for the soap to complete saponification and for water to evaporate, resulting in a harder, longer-lasting bar.
  6. After the Curing: Unmolding, Cutting, and Storage

Your soap has now undergone a critical transformation during the curing process. It’s not just about waiting; it’s about the flavors, the hardness, and the gentleness all developing into their best form. Here’s how to proceed once the curing period, which typically lasts about four to six weeks, is over.

Unmolding your soap is the first step, and it requires a gentle touch. Start by ensuring your soap is fully cured and firm enough to handle. You may need a bit of patience and gentle nudging to ease the soap out of the mold without damaging it. If you used a silicone mold, you’re in luck—these typically release the soap quite easily.

Cutting soap is oddly satisfying. It’s where you decide the size and shape of your bars. You’ll want a sharp, non-serrated knife or a soap cutter for a smooth cut. A ruler can be handy to measure consistent bars, unless you’re going for a more rustic look. Press down gently but firmly, and voila, you’ve got individual soap bars.

For storing your soap, think dry and cool. Avoid direct sunlight and extreme temperatures that can cause melting or sweating. If you plan to use the soap yourself, a linen closet or a bathroom drawer is perfect. For soap intended for sale, wrap it in paper or plastic wrap to prevent surface oils from picking up dust.

Finally, if you’re feeling proud of your soap—which you should be—consider different packaging options for gifting or selling. Handmade labels or rustic twine can add a personal touch that reflects the care you’ve put into each bar. Remember, the presentation is nearly as important as the soap itself when it comes to making a lasting impression.

Cold process soap making is an art that rewards patience and precision. As you become more experienced, you’ll find joy in experimenting with new additives and techniques. Each batch offers a chance to improve and personalize your craft. Keep learning, keep trying, and take pride in the unique bars of soap that emerge from your very own kitchen.

Leave a comment

Best Essential Oils For Soap Making

Curiosity about crafting your very own soap is on the rise, and I’m here to help you navigate the fragrant world of essential oils. It’s not just about concocting a cleaning bar; it’s about the experience, the aroma, and the many perks that come with it.

What exactly are essential oils? They are potent plant extracts that retain the natural smell and flavor, or ‘essence’, of their source. These oils have been harnessed for centuries, not only for their delightful scents but also for their medicinal and therapeutic properties.


From the ancient Babylonians who used aromatic resins for their bathing rituals to the Egyptians who crafted perfumed balms, essential oils have always been a cornerstone in creating personal care products that cleanse, soothe, and delight the senses.

Don’t worry too much about figuring it all out right from the get-go. I’m here to guide you through choosing the ideal essential oils to elevate your soap-making game to aromatic excellence.

Top Essential Oils for Soap Making: Finding Your Signature Scent

When you’re diving into the world of soap making, the choice of essential oils can be overwhelming, but so exhilarating. It’s not just about picking any scent; it’s about finding the right notes that resonate with you and your future soap users. You’ll want to look for oils that retain their fragrance post-saponification, the chemical process that transforms oils into soap.

Let’s talk specifics. Lavender is a universal favorite, known for its soothing and floral scent. It’s a safe bet for your first batch. On the other hand, citrus oils like lemon and orange provide that bright, uplifting zestiness to kickstart the day. For those looking for a more earthy base, patchouli or cedarwood add depth and grounding notes.

Blending essential oils can be a form of art. Imagine concocting your own scent that can’t be found on store shelves. Start with the basics: a note from each category – top, middle, and base. Top notes provide the initial burst of scent, middle notes form the heart of the blend, and base notes give a lasting impression.

Remember, not all scents stick around after the soap cures. Citrus can be fleeting, so it may need to be anchored with a middle or base note. When testing blends, small batch trials are your best friend. This isn’t just a cautious approach to not waste materials, but also an opportunity to perfect your scent profile.

The Aromatic Benefits: What Scents Are Best for You

So you’re curious about the different effects that scents offer? I’m going to help you understand how the right aroma can do much more than just smell good. Scents in essential oils aren’t just about personal taste; they can also have profound psychological and therapeutic effects. For instance, lavender is renowned for its calming properties, while citrus scents like lemon or grapefruit can invigorate and uplift.

Choosing scents is also about considering what’s best for different skin types. If you have sensitive skin, chamomile or rose might be your go-to aromas, as they’re gentle and soothing. For oilier skin, I’d point you toward peppermint or tea tree oil, which are known to have purifying and balancing qualities.

What’s more, seasons and trends play a role in scent preferences. In my opinion, during the winter months, you might want warmer, spicier scents such as cinnamon or clove. Come summer, lighter, fresher scents like eucalyptus or bergamot could be more appealing.

Don’t worry too much about following the trends, though. Choose something that resonates with you. That being said, safety is paramount. Be mindful of the fact that while natural, essential oils are potent and can cause reactions in some people. This is crucial if you’re crafting soaps for a broad audience – always err on the side of caution and include clear information about the oils used.

Enhancing Your Soap with Essential Oils: Beyond the Scent

In my experience, adding essential oils to soap doesn’t just elevate the fragrance; it also boosts the soap’s innate properties. Essential oils bring a host of benefits to soaps. For example, some oils have strong antibacterial properties, which can make your soap more effective at cleansing.

You might not know this, but essential oils like tea tree oil are renowned for their anti-inflammatory benefits, helping to soothe skin conditions and relieve irritation. Alongside scent, I want to point out that essential oils can significantly enhance the moisturizing qualities of your soap, leaving the skin feeling soft and nourished after every wash.

Incorporating essential oils isn’t just about adding a nice aroma; it’s about enriching the soap with attributes that can contribute to skin health and overall well-being. When you mix these oils into your soap recipes, you also bring in vitamins and antioxidants that are beneficial for the skin. This isn’t just about a superficial benefit—it’s a deep, skin-loving boost.

Now, if you’re planning to sell your soaps, it’s essential to include accurate labeling. Consumers appreciate knowing what’s in their products, especially when it comes to skin sensitivities and ethical sourcing. I strongly encourage you to be as transparent as possible about the essential oils used, and their origin, to build trust and credibility with your customers.

Remember, you’re not just crafting soap; you’re creating an experience. The essential oils you choose can transform a simple daily routine into a luxurious, therapeutic ritual. That’s the magic of using nature’s extracts in soap making.

Posted in Uncategorized | Leave a comment

Soap Dish for Cold Process Soap

I just love this Soap Dish!!


Soap DishThis soap dish is perfect for handmade soap that needs to drain you can find this one by clicking on the link.

It is available in several colors.


Posted in Uncategorized | Leave a comment

Using Honey In Soap Making

I’ve always been fascinated by the natural ingredients that elevate our daily skincare routine – and honey is a real game-changer. Packed with moisturizing properties, honey isn’t just a staple in the kitchen; it’s a powerhouse in soap making. When infused into soap, honey attracts and retains moisture, which is exceptionally beneficial for keeping skin hydrated and supple.

Beyond hydration, honey is also replete with antioxidants. These compounds are crucial as they help protect the skin against environmental damage, such as pollution and UV rays. These antioxidants can reduce the appearance of wrinkles, bringing a youthful vibrancy to your skin with every wash. Continue reading

Posted in Bath and Body | Leave a comment

Life’s a beach soap

The Life’s a Beach soap was probably my 3rd best-seller. After the Egyptian Musk and the Blackberry Orange. I also sold a lotion, perfume oil, and bath salts all with this scent that was created from scratch. The image below shows a very tropical-looking soap! This is done with layering, and placement of a previously made orange tube of soap, and an elongated white sliver of soap.

Lots of work went into this bar!


Life’s a Beach soap recipe, a very tropical scent:

Continue reading

Posted in Recipes | Leave a comment

Coconut Soap

This coconut soap recipe was maybe not the best seller in the store, although blends that had a coconut scent were better sellers. Also, the toasted coconut scent sold better than the non-toasted scent. My best seller with a coconut scent in it was Life’s a Beach!

Coconut-scented soap bar, with its natural color.


Coconut soap recipe:

Continue reading

Posted in Recipes | Leave a comment

Anise

I will be using the #1 Basic Soap Recipe for this easy soap-making recipe with Anise essential oil which is natural and smells like licorice. This scent is considered to be a great kitchen bar as it is known to reduce odors on the hands from fish, onions, etc. Also considered to be an awakening scent for that morning shower. In my store, some people would smell this bar and say something like “Yum, Sambuca”, then we knew who the drinkers were, lol.

A beautiful black & white Anise soap by ArtFire!


This is an easy recipe in that it has one essential oil and can be tinted basic one color, or not. One bonus is this particular essential oil isn’t one of the expensive ones. When making soap I  decided that I had to have a price ceiling for essential oils, and that was $100 per liter or 32 ounces. The good news is I could still buy about half of them. Continue reading

Posted in Recipes | Leave a comment

natural pain relievers

There are natural pain relievers headaches, joint pain, muscle pain, and more. These natural ones are derived from a singular or combination of essential oils and other plant materials. I personally have used a natural essential oil pain reliever for years!  Even if any essential oil does not work completely on your pain, this is still beneficial, as this means you can use fewer pharmaceuticals.

Peppermint Plant


Some companies have started regulating essential oils. Canada has but the United States has not. For instance, just like supplements, essential oils are not regulated by the Food and Drug Administration. This means that essential oil products do not need to gain FDA approval before they are brought to the market and sold to consumers. Another reason to make your own natural blends from reputable suppliers. Continue reading

Posted in Scents | 2 Comments

bug repellent plants

These natural bug-repellent plants are the same that create the naturally repelling essential oils. As you can see, certain plants repel certain bugs and insects. But this allows you to create a bug-repellent that is perfect for your uses. For instance, you can make an ant-repelling spritzer with the mints and lime. Or if you are allergic to mosquitoes, focus on just those ingredients.

Make a bug-repelling rock garden like this one.


Another of the natural bug-repellent plants that creates an oil, is the Neem plant or tree. Continue reading

Posted in Scents | 1 Comment

bug repellent soap recipe

There have been a few names for this bug-repellent soap recipe, and mine was ‘Entomophobia’ or fear of insects. Customers loved the name. I’ve seen other names such as Bug Off, Buzz Off, Citronella Bar, Bug Me Not. One customer who bought one of these bars came back the next day to get 3 more. She said that she had placed her bug repellent bar on her nightstand and that alone kept the mosquitoes from attacking her all night. So she was here again to get bars for the rest of the family. Below are spritzer ideas! Continue reading

Posted in Recipes | Leave a comment