
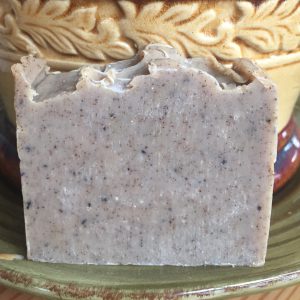
Making coffee soap is one of my favorite ways to turn something simple into a really useful, skin-loving bar. If you’ve ever wondered why you’d put coffee in soap, the answer is pretty simple—it works.
Coffee grounds add a gentle exfoliation that helps remove dead skin cells and leaves your skin feeling smooth and refreshed. They’re gritty enough to scrub but not harsh, which makes them perfect for everyday use—especially for hands.
If you’re new to cold process soap making, you might want to start with my beginner guide on how to make cold process soap at home.

☕ Why Add Coffee to Soap?
Coffee isn’t just for your morning cup—it brings some real benefits to handmade soap:
- Natural exfoliation
- Helps remove kitchen odours (garlic, onion, fish)
- Adds natural colour (no dyes needed)
- Contains antioxidants for skin support
- Gives a rich, warm scent
Use the recipe below to make your own DIY Coffee Soap
Using the basic recipe #1 – this is one of my best cold process recipes
- 1800 Grams Olive Oil
- 450 Grams Coconut Oil
- 300 Grams Palm Kernal Oil
- 250 Grams Palm Oil
- 250 Grams Grapeseed Oil
- 420 Grams Lye (Sodium Hydroxide)
- 4.5 Cups Water
Additives
- ½ cup used coffee grounds
- 2 oz coffee fragrance oil
If you’re still building your setup, this is a good place to use a digital kitchen scale for soap making to keep your measurements accurate.
☕ How to Make Coffee Soap
- Brew your coffee and save the used grounds (let them dry slightly).
- Prepare your lye solution safely.
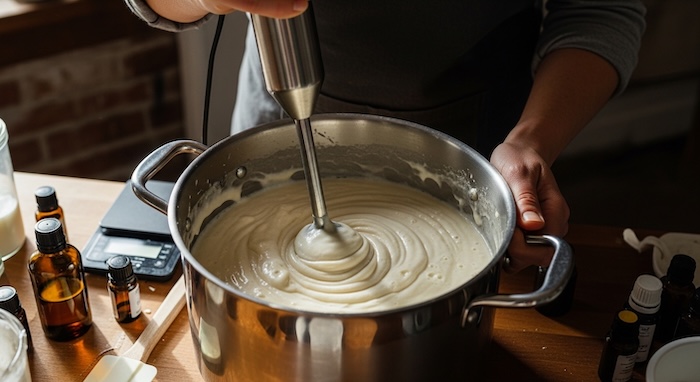
- Melt and mix your oils.
- Bring both to around 100°F (38°C).
- Blend to trace.
- Add your coffee grounds and fragrance oil.
- Pour into molds and insulate.
- Let sit 24–48 hours, then cut and cure for 4–6 weeks.
A good immersion stick blender for soap making makes reaching trace much easier and more consistent.
☕ Optional: Use Coffee Instead of Water
For a darker bar and stronger coffee feel, you can replace your water with brewed coffee.
Tip: Freeze your coffee into cubes before adding lye to prevent scorching.
🌿 Coffee Soap Benefits
✔ Natural Exfoliation
Coffee grounds gently buff away dead skin cells, leaving smoother skin behind.
✔ Helps with Acne & Skin Irritation
Coffee contains natural oils and enzymes that help cleanse pores.
✔ Odour Removal
Perfect for kitchen use—coffee soap naturally removes strong smells from hands.
✔ Antioxidant Support
Coffee contains compounds that help protect skin from environmental damage.
✔ Reduces Puffiness & Redness
Caffeine can help tighten blood vessels, reducing puffiness and redness.
✔ Great for Hair (Optional Use)
Using coffee in shampoo bars may help add shine and moisture to hair.
⚠️ Safety First (Very Important)
Before starting, always follow proper soap safety:
- Wear gloves, goggles, and long sleeves
- Always add lye to water (never the other way around)
- Work in a well-ventilated space
If you need a refresher, check out my full guide on soap making safety and handling lye
🧰 Helpful Tools for This Recipe
Here are a few tools I use regularly that make the process easier:
- silicone soap molds for cold process soap
- soap cutter for even bars
- heat resistant mixing bowls for soap making
🌱 Final Thoughts
Coffee soap is one of those simple recipes that just works. It’s practical, smells amazing, and has real benefits—especially if you spend time in the kitchen, garden, or workshop.
If you enjoy experimenting, try pairing coffee with essential oils like peppermint or vanilla for a custom blend.
You can also explore my guide on essential oils for cold process soap making (internal link) for more scent ideas.
🧼 Basic Cold Process Soap Instructions (Quick Overview)
Before starting, gather all your equipment and ingredients.
Mixing Steps
- Put on protective gear (gloves, goggles, long sleeves)
- Measure water and pour into your lye-safe container
- Carefully measure your lye
- Slowly add lye to water and stir until dissolved (in a ventilated area)
- Let the mixture cool
- Measure oils using a digital kitchen scale for soap making and heat to ~130°F
- Allow oils to cool to ~100°F
- When both mixtures reach ~100°F, combine
- Blend to trace using a stick blender
- Add fragrance and coffee grounds
- Mix thoroughly
- Pour into molds
- Cover and insulate
- Let sit 24–48 hours
- Remove from mold, cut bars
- Cure for 4–6 weeks
Disclosure:
The information provided on this website is for educational purposes only and should not be considered professional advice. Always practice proper safety when making soap or skincare products.
This post may contain affiliate links. As an Amazon Associate, I earn from qualifying purchases at no additional cost to you.
Updated April 2026
© 2017 – 2026, Tes. All rights reserved.