
Cold Process Soap Making: A Beginner’s Guide to Making Soap From Scratch
Why Choose Cold Process Soap Making?
Cold process soap making allows for complete customization. You decide:
-
Which oils and butters nourish the skin
-
How hard or bubbly the bar becomes
-
What colors, patterns, and textures to use
-
Whether to add essential oils, fragrance oils, or keep it unscented
From ultra-gentle baby bars to richly scented bath soaps or rugged garden soaps, cold process soap can be tailored to nearly any skin type or purpose.
That freedom does come with responsibility. Soap making relies on a precise chemical reaction called saponification, and one essential ingredient — lye (sodium hydroxide) — must always be handled with care. When used correctly, lye is fully consumed during saponification and does not remain in finished soap.
Soap making is an ancient craft with deep historical roots, but today it’s enjoying a modern revival. People want transparency, sustainability, and a closer connection to what they use on their bodies. Learning cold process soap making puts you squarely in that tradition.
Understanding the Basics Before You Begin
Before making your first batch, it’s important to understand why soap behaves the way it does.
Soap is created when fats or oils react with sodium hydroxide (lye) in water. Each oil has a unique fatty acid profile that determines:
-
Hardness
-
Lather quality
-
Conditioning level
-
Longevity of the bar
This is why soap recipes matter — and why random substitutions can lead to soft, brittle, or irritating soap.
Before choosing or modifying a recipe, it’s important to understand how oils work together and why balance matters.
👉 Read next:
These guides explain why certain oils cleanse more, why others are more conditioning, and how oil choices affect hardness, longevity, and mildness.
Gathering Your Cold Process Soap Supplies
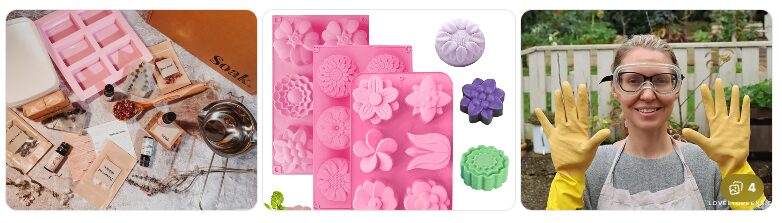
Cold process soap making requires both ingredients and equipment. Think of this as setting up a small, well-organized kitchen lab.
Essential Ingredients
Oils and fats – Common beginner choices include:
-
Olive oil – Gentle and conditioning
-
Coconut oil – Cleansing and bubbly lather
-
Palm oil or hard butters – Hardness and bar longevity
A soap making oil chart is invaluable for understanding how each oil behaves in a recipe.
Sodium hydroxide (lye)
Always use 100% pure lye labeled specifically for soap making.
Sodium Hydroxide Soap Making (What Lye Really Is)
Sodium hydroxide — also known as lye, NaOH, or caustic soda — is an essential ingredient for cold process soap making. In fact, cold process soap cannot exist without it. Since this website focuses on cold process soap, sodium hydroxide is a must-have ingredient.
When dissolved in water, lye creates a strong alkaline solution. This solution reacts with oils and fats in a process called saponification, transforming those ingredients into soap. When properly measured and fully cured, no lye remains in the finished bar.
Because of its chemical properties, sodium hydroxide is widely used in many industries, including:
-
Soap and detergent manufacturing
-
Pulp and paper production
-
Textile processing
-
Drinking water treatment
-
Cosmetics and skincare products
Yes — drinking water and anti-wrinkle creams often contain sodium hydroxide in carefully controlled amounts.
In municipal water systems, sodium hydroxide is used to raise pH levels in acidic water, helping prevent corrosion in pipes. In cosmetics, it’s commonly used as a pH adjuster and buffering agent. Some anti-aging products rely on very small amounts to stimulate skin renewal by encouraging mild surface response — a fact worth noting when reading ingredient labels on expensive creams.
Back to soap making: once soap has been poured, unmolded, and allowed to cure for 4–6 weeks, the saponification process is complete. At that point, there is no active lye left in properly made soap.
Sodium hydroxide is one of the most widely produced chemical bases in the world, with tens of millions of tonnes manufactured annually for industrial and consumer use.
Pure sodium hydroxide is a solid and is commonly sold as pellets, flakes, or granules. For soap making, it must be stored carefully. Lye is hygroscopic, meaning it absorbs moisture from the air, so it should always be kept in a tightly sealed, airtight container. Exposure to moisture can weaken its strength and affect soap recipes.
Distilled water
Prevents mineral interference and unpredictable reactions.
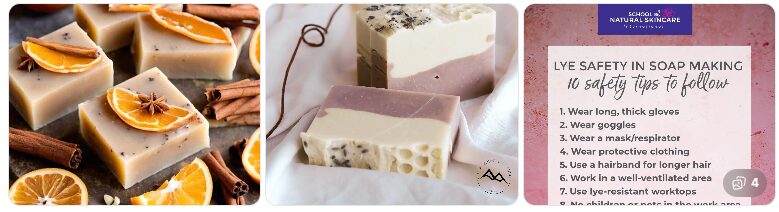
Soap Making Safety: Protecting Yourself When Working With Lye
-
When making soap, safety is not optional — especially when working with lye (sodium hydroxide). Lye is a caustic substance, and while it is completely safe when handled correctly, improper use can cause serious burns.
If lye solution splashes onto skin, it will continue to burn until it is thoroughly flushed with running water. This is why wearing proper protective gear and following safe procedures is critical every single time you make soap.
Essential Safety Gear for Soap Making
Always wear the following when working with lye:
-
Chemical-resistant safety goggles
Goggles that form a seal around the eyes offer the best protection against splashes. -
Chemical-resistant gloves
Gloves should extend past the wrists and ideally over the sleeves of your shirt. -
Long sleeves and closed shoes
Exposed skin increases the risk of burns. -
Chemical-resistant apron
Protects clothing and your body from accidental spills.
Cheap safety glasses and thin household gloves may seem adequate, but lye can burn through inferior materials. Investing in proper protective equipment is worth it — especially when it comes to your eyes and skin.
Preparing Your Soap-Making Area Safely
Before you begin:
-
Put on goggles first
-
Wear a long-sleeve shirt and closed shoes
-
Put on your apron
-
Put on gloves, pulling them over your sleeves
-
Protect your workspace with old towels, newspapers, or a shower curtain
-
Keep children and pets completely out of the area
Important: Always add lye to water — never water to lye.
Adding water to lye can cause a dangerous eruption that may splash caustic solution outward.
What Happens to Lye in Finished Soap?
After soap is poured, cut, and allowed to cure for 4–6 weeks, the saponification process is complete. When properly measured, there is no active lye left in finished soap — only a gentle, skin-safe bar.
👉 For detailed emergency steps, protective gear reviews, and burn treatment:
What to Do If You Get Lye on Your Skin -
Once you understand the role of lye and how to work with it safely, the next step is gathering the right tools.
Tools You’ll Need
-
Digital scale (accuracy is critical)
-
Heat-safe containers
-
Silicone or lined molds
-
Stick blender
-
Thermometer
-
Spatula and spoon
Measuring Accurately and Using Fresh Ingredients Matters
Cold process soap making is as much about precision as it is creativity. Even a beautifully designed recipe can fail if lye amounts are incorrect or if oils have begun to degrade.
Accurate measurements ensure safe, well-balanced soap, while fresh oils help prevent issues like soft bars, poor lather, or dreaded rancidity. Before moving forward, it’s worth understanding how to measure lye properly and how to recognize oils that are no longer suitable for soap making.
👉 Read next:
The Cold Process Soap Making Method: Step by Step
1. Prepare Your Workspace
Set out all supplies before you begin. Put on safety gear and ensure pets and distractions are removed from the area.
2. Measure Precisely
Weigh oils, lye, and water using a digital scale. Accuracy ensures proper saponification and safe soap.
3. Mix the Lye Solution
Slowly add lye to water (never the other way around). Stir until dissolved and allow it to cool.
4. Heat and Combine Oils
Warm oils gently until melted and within 95–110°F, matching the lye solution temperature. This range is forgiving for beginners and allows enough time to reach trace without rushing.
Understanding Trace
Slowly combine lye water with oils. Stir or pulse with a stick blender until the mixture thickens to light trace — similar to thin pudding.
Trace is the stage where the lye solution, water, and oils have fully emulsified and begun turning into soap. At this point, the mixture thickens slightly and will no longer separate if you stop stirring.
In simple terms, trace is the moment your mixture becomes soap.
When trace is reached:
-
The soap base becomes thicker
-
Oils no longer float on top
-
The mixture holds its shape briefly when drizzled
This is also the stage when you add:
-
Essential or fragrance oils
-
Colorants
-
Clays, botanicals, or exfoliants
-
Superfat oils
Once additives are mixed in, the soap is poured into molds.
What Does Trace Look Like?
A common way to identify trace is the drizzle test. When you lift your spoon or stick blender and drizzle soap across the surface, it will sit on top briefly instead of immediately sinking back in.
Trace can range from light to thick, and soap will continue to thicken from this point forward.
🧼 Beginner Tip:
Trace becomes easier to recognize once you’ve seen it. The first time it clicks, it never feels confusing again.
Signs That Soap Has Reached Trace
-
The mixture becomes a slightly lighter color
-
The oil layer no longer separates
-
The soap base thickens
-
It stays blended if stirring stops
-
Drizzled soap leaves a visible line on the surface
-
That line may slowly sink back in (light trace)
How Trace Happens
Trace occurs when the chemical reaction between oils and lye has progressed far enough that the mixture is stable and fully emulsified. During this stage, the pH of the lye solution is actively being neutralized as soap forms.
You can reach trace by hand-stirring, but a stick blender dramatically speeds up the process. When using a stick blender, keep the blade fully submerged to avoid splashing — lye solution is still caustic at this stage, so protective gear is essential.
Under-Trace vs Over-Trace
-
Under-traced soap may separate in the mold, potentially leaving oil on top and a lye-heavy layer below
-
Over-traced soap becomes thicker and may need to be spooned into molds — which is perfectly safe and acceptable
It is generally better to slightly over-trace than under-trace, especially for beginners.
Once trace is reached, your soap is now unscented, uncolored soap — ready for customization and molding.
👉 For a deeper dive, see: What Is Superfatting in Soap Making?
This is when you can add:
-
Essential oils or fragrances
-
Natural colorants
-
Additives like oats, herbs, or clays
6. Pour and Insulate
Pour soap into the mold, tap gently to release air bubbles, cover, and insulate for 24–48 hours.
Once you’re comfortable with basic cold process soap recipes, natural additives like honey can be introduced — this guide on using honey in soap making explains how to do it safely.
Curing Soap: Why Patience Matters
Once unmolded, soap must cure for 4–6 weeks. During curing:
-
Excess water evaporates
-
The bar hardens
-
Mildness improves
-
Longevity increases
This step cannot be rushed if you want high-quality soap.
Soap pH Levels & Safety (Beginner Overview)
New soap makers often worry about pH — and that’s a good thing. Testing the pH of handmade soap helps confirm that it is safe, fully saponified, and ready to use.
Fresh soap can test slightly high when first unmolded. This is normal. During the 4–6 week curing period, excess moisture evaporates and the pH stabilizes.
Properly made cold process soap typically falls within a safe pH range of 7–10. Soap that tests above this range may indicate excess lye and should not be used.
There are several ways to test soap pH, including pH strips and traditional methods. Each has pros and limitations, and testing should always be done after curing, not immediately after unmolding.
👉 Learn how to test soap pH safely and accurately:
Soap and pH Levels: How to Test Homemade Soap Safely
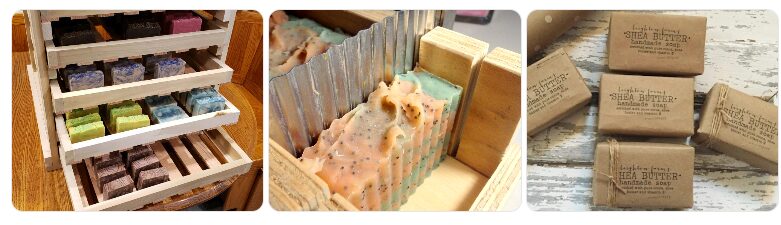
Unmolding, Cutting, and Storing Finished Soap
After curing, gently unmold the soap. Silicone molds release easily, while lined molds may need a bit of patience.
Cut bars using a sharp knife or soap cutter. For consistent sizing, measure first — or embrace a rustic, handmade look.
Proper Storage
-
Store in a cool, dry place
-
Avoid direct sunlight
-
Wrap finished bars for gifting or sale
Simple paper wraps, twine, or handmade labels highlight the craftsmanship behind each bar.
Using Natural Additives Safely in Cold Process Soap
Once you’re comfortable with the basic cold process method, many beginners start experimenting with natural additives like milk, honey, clays, or botanicals.
I’ve written a full beginner-friendly guide that walks through exactly how to use these ingredients without cracking, overheating, discoloration, or DOS.
👉 You can read more about natural additives in cold process soap here.
Growing Your Skills as a Soap Maker
Cold process soap making rewards patience, practice, and curiosity. Each batch teaches you something new — whether it’s how oils behave, how fragrance oils perform, or how designs evolve.
As your skills grow, you can explore troubleshooting techniques, natural colorants, swirl designs, and common beginner mistakes — all of which help refine your craft over time.
Soap making is more than a recipe — it’s a skill that grows with you. And once you master the basics, the creative possibilities are endless.
Important Note:
This information is for educational purposes only.
This post may contain affiliate links. If you make a purchase through these links, I may earn a small commission at no extra cost to you.
Updated Jan 2026
© 2026, Tes. All rights reserved.
Hello.
I recently retired and have loads of time on my hands. While searching online for a hobby, I somehow landed here, and I’m glad I did. After reading this article, it occurred to me that this might be exactly what I need to pursue. The complexity and simplicity of soap-making at the same time present a challenge, and they have my mind going on which type to try first. Your article is clear and direct, with easy-to-follow steps that give me a clear pathway to attempting my own soap.
A bit of a backstory, I go to loads of out markets and have seen homemade soaps. I have always wondered how it was done, and now I know. Your site is now bookmarked so I can come back and learn as I go.
Thank you!
Michael
Soap making really is the perfect mix of simple and creative, and it’s a great hobby to explore with extra time. Starting slow and learning as you go is part of the fun. I’m so glad you found the site helpful and bookmarked it — welcome, and enjoy the journey!
Hi, I’ve never thought about making my own soap before but I’ve definitely thought about what I’m washing with. I like shower gel but I do worry about what toxic chemicals could be inside. I mean I guess just normal soap is better but with that being said even this could have chemicals in it. I’m probably sounding a bit mad with all these poison soap ideas but whatever the case at least if you are making your own you know what is inside. It doesn’t look to hard either so maybe something to try.
Have you ever made bath salts out of curiosity? I visited the dead sea recently and found a huge rock of salt – I didn’t bring back with me but being somewhere so rich in minerals I thought it would be cool to make some. Not the same as soap I know but I guess it is another DIY thing people can do that can make good home made self care products for cheap.
Hi Alex, I would love to visit the Dead Sea. What an experience that must have been and Yes I do make bath salts and I do put dead sea salt in them. Here is a recipe if you want to make your own.
https://makingsoapnaturally.com/bath-body-care-products-you-can-make-for-yourself
Soap making is something that I have always wanted to try out, but there are no courses near me. Do you think I could learn how to do it by following tutorials on the internet, or is it safer to go with someone live who knows what they are doing. Also is it dangerous if you get the consistancy wrong, as I have heard of it exploding on a stove and that could be quite dangerous.
Yes, you can absolutely learn soap making from online tutorials. Many people do. The key is to start with a simple, well-tested recipe and follow the instructions carefully. Here is a link to some tutorials you can print out:
https://www.etsy.com/ca/shop/MakingSoapNaturally
Soap doesn’t explode on the stove — that’s a common misconception. Cold process soap isn’t cooked at all. You simply mix oils with a lye solution and let the soap cure in a mold.
Lye does require care because it’s caustic before it reacts with the oils, so gloves and eye protection are recommended. But if you measure accurately and follow basic safety steps, soap making is very safe and very enjoyable to learn.
This is such a thorough and encouraging guide; thank you! I’ve been curious about cold process soap making for a while now, mostly because I have really sensitive skin and I’ve never been fully confident in what’s actually in the commercial bars I’ve been using.
The part about glycerin staying naturally in handmade soap genuinely surprised me. I didn’t realize that was something commercial soaps typically remove.
My question is about oils and butters; do certain ones tend to work best for sensitive or reactive skin? I want to make sure my first batch is gentle enough that I’m not trading one irritant for another!
Thank you—that’s a great question!
For sensitive skin, keep it simple and gentle. The best beginner-friendly oil is:
Olive oil (very mild and conditioning)
Avoid strong fragrances at first, maybe try an unscented batch first or a gentle scent like lavender
Simple recipes with fewer ingredients are usually the safest place to start here is a link to my Castile Soap Recipe (100% Olive Oil) History, Truth & My Honest Experience
This was such a helpful and approachable guide. I really appreciate how you broke the cold‑process method down into simple, manageable steps without losing any of the important safety details. The way you explained lye handling, temperatures, and trace made the whole process feel far less intimidating. It’s amazing how empowering it feels when someone explains a craft in a way that’s both practical and encouraging. I’m curious which part of the process you think beginners should focus on first to build confidence.
Thank you so much—I really appreciate that!
If I had to pick one thing for beginners to focus on, it would be mastering a simple recipe and repeating it a few times. That’s what helps you truly understand trace, timing, and lye handling—and builds real confidence quickly. Try one of these basic recipes Basic Soap Recipes – my 6 at a glance
Once that feels easy, everything else (scents, colors, designs) becomes much more fun and less stressful.
I really like how you balanced creativity with precision here. In my opinion, the way you explained lye stands out—you made it feel approachable without downplaying the importance of safety, which is huge for beginners.
I also agree with your point about curing. That’s probably where most people get impatient, but it really makes a difference in the final result.
Thanks for the comment, curing is important using your soap early or selling it before it has cured isn’t a good idea. Using it before final curing can turn the bar mushy when used and the bar will disappear pretty quickly. A nicely cured bar of soap will last a long time.