Before you begin making soap, it’s important to gather the right supplies — but soap making does not have to be expensive or complicated. When I first started, I used many items I already had around the house, along with a few second-hand finds from garage sales and thrift stores.
One rule has always stayed the same for me:
Anything used for soap making should never be used again for food.
Lye is caustic, and even small residue can be dangerous.
This guide walks you through the essential soap making supplies beginners actually need, along with a few optional shortcuts for those who prefer to start with a kit.
If you’re new to soap making, you may also want to read my guide on 👉 cold process soap making for beginners to understand how these tools are used step by step
Once you’re comfortable with basic cold process soap recipes, natural additives like honey can be introduced — this guide on using honey in soap making explains how to do it safely.
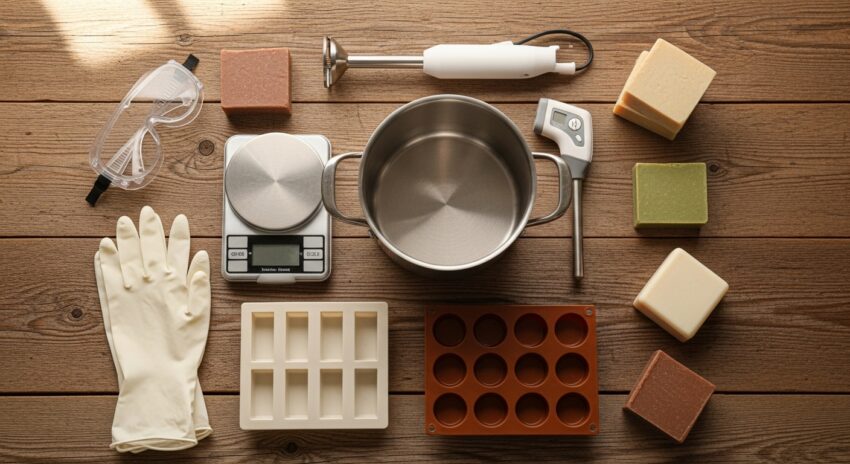
The Core Soap Making Supplies Every Beginner Needs
These are the tools you will use again and again, regardless of the recipes you make.
Stainless Steel Pot
A stainless steel stock pot is used to measure and gently heat your oils. Aluminum should never be used, as it reacts with lye.
A dedicated stainless steel stock pot for soap making keeps your soap equipment separate from kitchen cookware and avoids chemical reactions.
Digital Scale (Non-Negotiable)
Soap recipes are written by weight because even small measurement errors can result in lye-heavy or overly soft soap. Measuring by volume can lead to inconsistent results and unsafe bars. A reliable scale removes guesswork and helps ensure your soap is both safe and consistent.
Accurate weighing goes hand in hand with proper lye calculations, which is why understanding 👉 how to calculate lye safelyis just as important as owning a good scale.
Because soap making is chemistry, oils and lye must be weighed — not measured by volume. A digital scale that measures in grams and ounces is essential for accuracy and safety.
A digital kitchen scale with a tare function makes weighing oils and lye accurate and stress-free for beginners.
Thermometer
You’ll need a thermometer to monitor both your oil temperature and your lye solution temperature before combining them.
A simple digital or candy thermometer helps ensure your oils and lye solution are within a workable temperature range.
Lye & Water Mixing Container
You need a heat-safe container dedicated solely to mixing lye and water. Heavy plastic or glass works well. I used an old Pyrex coffee pot for years. The container should be sturdy, heat-safe, and easy to pour from, as the lye solution becomes very hot during mixing.
Always mix lye in the sink or inside a plastic tub — I once burned a small hole in my countertop from a splash.
A heat-safe plastic pitcher or chemical-resistant container is ideal for safely mixing lye and water.
Because lye is caustic, it’s important to understand 👉 lye safety in soap making before working with it.
Measuring Cups & Spoons (Dedicated)
Measuring cups are used for water and liquid additives. Measuring spoons are used for colorants, clays, and small amounts of essential or fragrance oils.
Keeping a dedicated set of measuring cups and spoons for soap making helps prevent cross-contamination.
If you’re unsure which scents to use, understanding 👉 essential oils vs fragrance oils in soap making can help you make informed choices.
Stick Blender (Immersion Blender)
While soap can technically be stirred by hand, a stick blender saves time and produces more consistent results by bringing soap batter to trace quickly. Without a stick blender, it can take a very long time to reach trace, which increases the risk of false trace or uneven saponification.
A dedicated immersion blender for soap making makes blending faster and far more consistent.
Wooden Spoons
Wooden spoons are useful for stirring oils and lye solutions. I recommend having at least two — one for oils and one just for lye.
Soap Molds
Soap molds can be purchased or improvised. Wooden molds, silicone loaf molds, milk cartons, and drawer dividers all work.
Silicone soap loaf molds are especially popular with beginners because they’re flexible and easy to unmold.
Beginners often benefit from learning more about👉 choosing the right soap mold based on batch size and soap style
Soap Liners
Soap liners prevent soap from sticking to molds. I often use butcher paper, but freezer paper or reusable liners also work well.
Freezer paper or pre-cut soap mold liners make lining molds quick and frustration-free.
Insulation (Blankets or Towels)
Old towels or blankets are used to hold heat in the soap mold while saponification takes place.
Soap Cutter or Sharp Knife
You can cut soap with a sharp knife, but a soap cutter produces cleaner, more even bars and is worth the investment if you plan to make soap regularly.
A soap cutter with adjustable guides makes cutting uniform bars much easier than using a knife.
These tools are exactly what I use when making my Oatmeal Honey Soap Recipe, one of the most popular gentle soaps on my site.
Safety Equipment (Absolutely Essential)
Working with lye requires proper protection. Fresh soap batter is also caustic.
Even experienced soap makers use full safety gear every time, as accidents can happen quickly and unexpectedly.
Even with precautions, accidents can happen, so it’s important to know 👉 what to do if lye touches your skin
You should always use:
-
Safety glasses or goggles
-
Chemical-resistant gloves
-
An apron or long sleeves
Chemical-resistant nitrile gloves protect your hands from lye and raw soap batter.
Safety goggles are essential to protect your eyes from accidental splashes.
Workspace Protection
Cover your work surface with a plastic tablecloth, garbage bags, or any protective barrier to prevent damage from spills.
Disposable plastic tablecloths are an easy way to protect countertops while making soap.
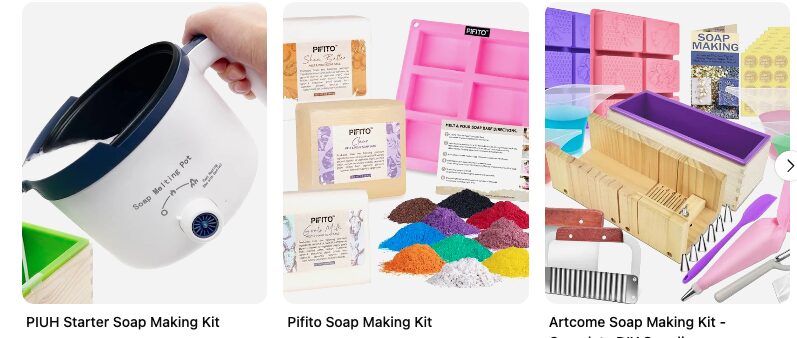
Best Kits for Beginners & What They Include
1. PIUH Starter Soap Making Kit – A well-rounded kit that includes a soap melter and tools, perfect if you’re starting cold process from scratch.
👉 This starter kit bundles many tools you’ll use often, saving you from buying each item separately.
2. Pifito Soap Making Kit – A slightly larger kit with quality components, great if you want a mix of tools and molds.
👉 This kit is ideal for beginners who want broader options without buying every tool individually.
3. Artcome Soap Making Kit – Complete DIY Supplies – A complete DIY soap making kit with silicone loaf mold, wooden cutting tools, and measuring cups.
👉 A good all-in-one option if you want both tools and molds in one bundle.
4. Artcome DIY Soap Making Kit – Basics – A budget-friendly starter kit focusing on essential tools.
👉 This basics kit is great if you want a starter set with fewer items but solid fundamentals.
5. Creations Soap Making Kit – A premium kit with expanded tools and accessories for serious beginners.
👉 This kit is worth considering if you know soap making is something you’ll stick with long-term.
6. Just My Style You*niverse Sparkling Squishy Soaps – A fun option for kids or craft-oriented projects (not cold process).
👉 This is more of a craft kit than a traditional soap making starter — perfect for family or kids’ projects.
If you prefer to avoid working with lye entirely, you may want to explore 👉 making soap without handling lye. as an alternative starting point.
💡 Tip: Starter kits are a smart way to begin soap making because they bundle many tools and molds together in one purchase, making your first experience easier and more fun.
Final Thoughts
Soap making doesn’t require expensive equipment or a fully stocked workshop to get started. Many of the tools you need can be found around your home or purchased gradually as you gain confidence and experience.
Start with the essentials, focus on safety, and allow yourself room to learn. Over time, you’ll naturally discover which tools you use most and where it makes sense to upgrade. Soap making is a skill built through practice — not perfection.
Frequently Asked Questions (FAQ)
Do I need to buy all of these soap making supplies to start?
No. Many beginners start with basic household items and add tools over time. The most important items to invest in early are a digital scale, safety equipment, and heat-safe containers.
Can I use kitchen tools for soap making?
Only if they are permanently dedicated to soap making. Once a tool has been used with lye or raw soap batter, it should never be used for food again.
Are soap making starter kits worth it for beginners?
Starter kits can be helpful if you want to avoid sourcing individual tools. They are optional, not required, and best suited for beginners who prefer convenience over customization.
Is a stick blender really necessary?
While soap can be stirred by hand, a stick blender dramatically reduces mixing time and helps achieve consistent results. Most soap makers consider it an essential tool after their first few batches.
What is the most important safety item for soap making?
Eye protection and chemical-resistant gloves are critical. Lye is caustic, and even small splashes can cause serious injury if proper safety precautions aren’t taken.
Important Note:
This information is for educational purposes only.
This post may contain affiliate links. If you make a purchase through these links, I may earn a small commission at no extra cost to you.
Updated Jan 2026
© 2016 – 2026, Tes. All rights reserved.
Hello,
Very interesting niche and very nice design. It seems that you need quite a lot to make your own soap. Also, it’s kinda surprising that almost all supplies I can find in my home even today! I will definitely think about making soap on my own.
Keep up the good work!
I LOVE this site! I’m always excited about making things at home and this page offers beautiful, inspiring visuals and awesome detail regarding supplies.
I’m curious, do you use scent or texture additives and if so which ones do you recommend? I’m looking forward to learning more about the process, thank you!
Thanks Laura, Yes I do use scents and textures – I use essential oils for scenting and oatmeal, jojoba beads etc for texture. For scenting you can use fragrance oils but to keep it natural essential oils would be best. I have articles planned for both those subjects, that will go into detail on each. I hope to have them up on the site soon.
My daughter is making her soap now. I have not talked to much about it. You describe the things you need in a interesting way. It kept me engaged the whole time. I would like to know material cost per bar of soap to if it is worth the time to make. Thanks Dave
Making your own soap can be very rewarding, the cost per bar will depend on many factors ie: what oils you choose, whether you can buy from a wholesaler or the local grocery store, what size of bar, additives such as essential oils or colors. The best thing is to figure out the cost of the ingredients and divide that into the amount of bars produced. The cost per bar can range from .95 to 4.00 or more a bar.
Just the post I’ve been wanting to read. I have been interested in making soap for awhile now, but I have heard it is a hard process. Is this true? Do you have a recipe I could follow? Good idea on finding supplies at a garage sale. Always great to save some money. What is the difference of a candy thermometer to a regular one? Thank You
–Rina
Glad you found my site! I have been making soap for a long time, I don’t consider it a hard process, just following the instructions and getting used to the process before trying to create your own recipes. I use a meat thermometer for testing the temperatures, but there are others out there that will do the same. I’m sure your candy thermometer will do just fine. Just remember it’s important to keep your soap making utensils separate from your home kitchen ones. I do have some recipes with more coming. You can check out this page Recipes