
Cold Process Soap Making Instructions
Making cold process soap at home is one of the most rewarding ways to create natural, long-lasting bars of soap from scratch.
I’ve been making cold process soap for many years and regularly prepare batches for markets and craft fairs.
Today I’m making a simple tea tree cold process soap using a recipe I’ve relied on for years. With several craft fairs coming up, this batch gives me the perfect opportunity to show you exactly how to make cold process soap step by step, with photos illustrating each stage of the process.
This beginner-friendly tutorial uses no added color, making it an excellent starting point if you’re new to cold process soap making.
What Is Cold Process Soap?
Cold process soap is made by combining oils and lye (sodium hydroxide), which react through a chemical process called saponification. This process transforms the ingredients into real soap and natural glycerin, creating a hard, long-lasting bar that improves with curing time.
Unlike melt-and-pour soap, cold process soap gives you full control over ingredients, oil choices, and additives.
Cold Process Soap Recipe Used in This Tutorial
Oils
-
1800 g Olive Oil
-
450 g Coconut Oil
-
300 g Palm Kernel Oil
-
250 g Palm Oil
Lye Solution
-
420 g Sodium Hydroxide (Lye)
-
1085 g Water (4.5 cups)
⚠️ Always confirm recipes using a soap lye calculator before making soap.
Soap Making Supplies Needed
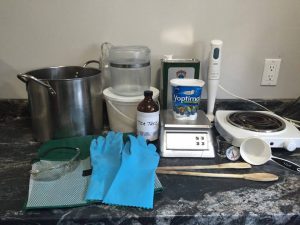
Safety Equipment
- Safety glasses
- Gloves
- Apron
Tools
- Stainless steel stock pot
- Digital scale
- Thermometer
- Stick blender
- Heat-safe containers for lye and water
- Wooden spoons
- Hot plate or stove
- Measuring Cup
How to Make Cold Process Soap (Step-by-Step)
Step 1: Prepare Your Workspace and Safety Gear
Before handling lye, prepare your soap-making area.
Cover your work surface with newspaper or plastic, put on safety glasses, gloves, and an apron, and ensure good ventilation. Keep pets and children out of the area while making soap.
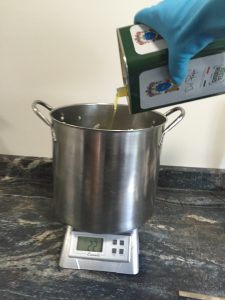
Step 2: Measure Oils for Cold Process Soap

Accurate measurements are essential for successful cold process soap making. Soap is chemistry, and even small errors can affect safety and performance.
Using a digital scale, weigh each oil according to your recipe. Measure solid oils first, followed by liquid oils such as olive oil.
You can measure oils into separate containers or use the tare function on your scale to measure everything directly into the soap pot.
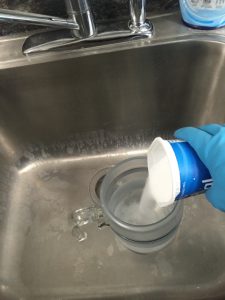
Step 3: Measure the Water and Lye Separately
Put on your safety glasses and gloves before handling lye.
Measure the sodium hydroxide by weight using a scale, and measure the water separately using a heat-safe container. Double-check measurements before moving on.
Never guess lye amounts — always follow a tested recipe or use a lye calculator.
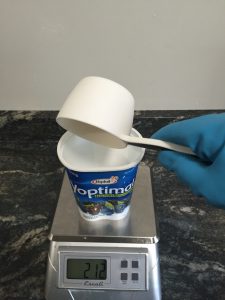
- I always measure the lye (Sodium Hydroxide) by grams and my water in cups, your recipe may be in ounces so use what the recipe tells you.
- The recipe will let you know how much lye you need for your oils.
- I use old margarine or yogurt containers to weight the lye and a measuring cup for the water, be sure to have your safety glasses on and wear gloves.
- You want to avoid the danger of a lye burn, as careful as you can be it does sometime happen.
Here you can find out What to do if you get lye on your skin
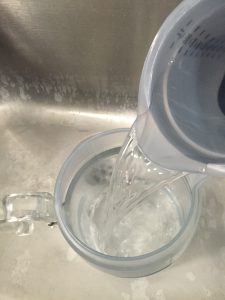
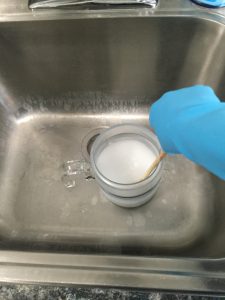
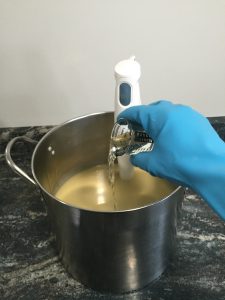
Step 4: Mix the Lye Solution Safely
Place your lye-safe container in the sink or inside another container.
-
Pour the measured water into the container
-
Slowly add the lye to the water — never add water to lye
-
Stir gently while standing back to avoid fumes
The solution will heat up quickly and release fumes. Stir until the liquid becomes clear, then set it aside to cool to 95–105°F.
-
- Pouring the measured out water into a container
- Always pour the water into your container first!!
- I use an old glass pyrex coffee pot for my lye/water mixture.
- I’m always hunting for these at garage sales or second hand stores, the lye (sodium hydroxide) will etch them in time so I replace them as often as I can.
- I always put my lye/water container in the sink, because you never know.
- If it were to break…well I don’t even want to think about that.
-
- Adding the lye to water
- You can use other containers as well, but I have always put whatever my lye/water mix is in, into something else just in case of spillage.
- So pour the required amount of water into your lye/water container and I’ll say it again ………
- “Always add the lye to the water” it can cause a volcano like event if reversed.
-
- Mixing the lye into the water
- Now take your measured lye and very slowly pour it into the water and stir continuously while standing back to avoid the fumes. This solution will heat up.
- Keep stirring until the mixture becomes clear, then you can go back to your oil mixture.
- Now that your lye solution has heated up you will leave it to cool down to between 95 and 105 degrees fahrenheit.
For more information on lye (sodium hydroxide) click on this link.
Step 5: Heat and Cool the Oils
Gently heat the oils until fully melted, reaching approximately 120°F. Remove from heat and allow the oils to cool to 95–105°F, matching the temperature of the lye solution.
- The oils will need to be heated up now. I use a hot plate and simply place the soap pot on it.
- The oils should be heated up to approximately 120 degrees fahrenheit.
- Once they have reached this temperature the pot should be removed from the hot plate and left until the oils have cooled down to between 95 and 105 degrees fahrenheit.
- The key is to add these two liquids to each other when they have both reached the same temperature. That temperature being between 95 and 100 degrees.
- When you are waiting for the oils and lye solution to come to temperature, this is a good time to line your mold.
- For more information go to How to Line your Soap Mold
Step 6: Combine Oils and Lye Solution
When both mixtures are within the same temperature range, slowly pour the lye solution into the oils.
Stir by hand at first, then use a stick blender in short bursts, alternating with stirring to prevent air bubbles.
- When both the lye solution and the oils have reached the required temperature it’s time to mix them together.
- I use the stock pot so I can add the lye to the oils (there is plenty of room in this pot).
- When the temperatures are good slowly start to pour the lye solution into the pot with the oils and stir by hand mixing up the oils and lye solution.
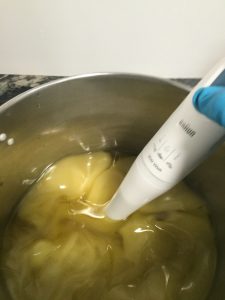
Step 7: Bring Soap to Trace
Trace occurs when the soap batter thickens to a pudding-like consistency and leaves a visible trail when drizzled across the surface.
Light trace is ideal for simple recipes and beginner soaps.
You can continue to mix with your wooden spoon until it traces (looks like pudding) but it can take a long time. I use a stick blender. For more on trace – go to What is trace?
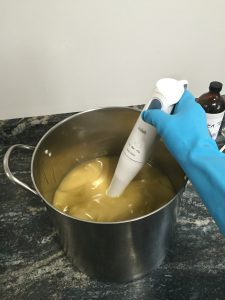
Step 8: Add Essential Oils
Once trace is reached, add the measured tea tree essential oil and stir thoroughly to distribute evenly throughout the soap batter.
For this lesson I am not adding any color, just Tea Tree Essential Oil. Measure the essential oil, add to the soap mixture and mix up well.
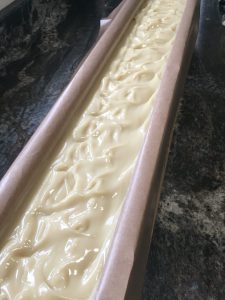
Step 9: Pour Soap Into the Mold
Pour the soap batter into the prepared mold, tapping gently to release air bubbles.
Cover the mold with cardboard or a lid and insulate with a towel or blanket to retain heat and complete saponification.

Step 10: Insulate and Rest
Allow the soap to rest undisturbed for 24–48 hours. If the soap is still warm or soft after 24 hours, leave it longer before unmolding.
- I cover this mold with a piece of cardboard that has been cut to fit over the top nicely, I then cover that with an old wool blanket.
- Now it’s time to wait, you can check your soap in 24 hours.
- If it is still warm leave it for another 24 or until it is cold.
- The time can depend on the size of your mold. With my molds I leave my soap for 2 days.
- For information on scenting your soap click on this link
- When your soap is ready
- Once the soap is cooled it can now come out of the molds, cut and placed to cure for 4 weeks.
- During the curing period it is important to turn your bars making sure that all sides get exposed to the air. This will ensure they cure well.
Step 11: Unmold, Cut, and Cure
Once fully cooled, remove the soap from the mold and cut into bars.
Place bars on a curing rack and allow them to cure for at least 4 weeks, turning occasionally so all sides are exposed to air. Curing improves hardness, mildness, and longevity.

Cold Process Soap Making FAQ
Is cold process soap safe for beginners?
Yes, when proper safety precautions are followed and recipes are measured accurately.
How long does cold process soap need to cure?
Most cold process soap requires 4–6 weeks of curing.
What happens if lye measurements are wrong?
Incorrect measurements can result in unsafe, brittle, or overly soft soap.
Can I make cold process soap without a stick blender?
Yes, but it takes significantly longer to reach trace.
Final Thoughts
Cold process soap making takes patience and attention to detail, but the reward is a natural, long-lasting bar of soap you can be proud of. With accurate measurements, proper safety practices, and adequate curing time, beginners can absolutely succeed with this traditional soap-making method.
Important Note:
This information is for educational purposes only.
This post may contain affiliate links. If you make a purchase through these links, I may earn a small commission at no extra cost to you.
Updated Jan 2026
I am very impressed with the details of the instructions. The pictures are very helpful in what seems like a tedious process. I also love the soothing lavender color that occupies the header. I instantly thought of lavender soap which is extremely appropriate!! Keep up the good work!
thanks for the lovely comments
This is very interesting and even though I have never even thought of making my own soap before, your post is detailed enough that I could probably try making my first soap bar. But did I miss something, I am just unsure what lye means/is? And I guess you can add scent you want? Oh can you make it smells like candy?! Thanks for the info.
Hi Summerly,
Lye is also known as Sodium Hydroxide. It is essential to soap making as the lye/water solution when mixed with the oils creates a reaction called saponification. Here is a link for some more detailed information for you http://makingsoapnaturally.com/lye-soap-making You can add whatever scent you choose, that would be added at trace. There are many scents out there including candy.
Hi, great tips on how to make your own soap. I did it once in chemistry lab and remember that it was a long process. Just a question, where do you find your ingredients? I can’t find sodium hydroxide at our chemist, is there somewhere specific you find it?
It’s very clear instructions, you make it sound easy. Thanks for the info!
Hello Ninene, I get my ingredients from different suppliers depending on what I am ordering. As for the sodium hydroxide. You can get it at most Hardware stores, but I’m not sure it is the same quality as the sodium hydroxide that the soap supply stores offer. Most suppliers of soap and candle making supplies will be able to sell you sodium hydroxide. However they can not ship it via mail, when I order mine it comes via greyhound. I hope this helps to answer your question. Thanks for stopping by my site.
I LOVE THIS POST! I’m always looking for fun new ways to work with natural body products. I use to make my own lotions but I’ve never made my own soaps. Do you make them for yourself? Or do you sell them? I’d really love to try your method. Thank you so much for sharing this recipe!
Hi GerraeLove, I have been making my own soap for many years and I also sell them at Farmer’s Markets, Craft Fairs and Retail outlets. It started as a necessity due to skin problems, but then into a labour of love. You can find some of my products here My Natural Handmade Soaps
Great instructions. Very detailed and the pictures were a bonus. I love natural soap but always felt like it would be an overwhelming process to produce my own. Your instructions made me feel a little more confident about making my own soap. It’s great that you have links to the supplies as well. Thanks.
Hello Tugarcia, I’m glad this article gave you more confident in making soap. It’s so nice to have your own natural soap, and knowing what you are putting on your skin.
Hi Teresa. I was wondering if you can leave out certain oils. I’d only like to use a few instead of all of them. Will it harden the same? What are your thoughts. Thanks.
Laura
Hi Laura,
You can use whatever oils your would like for making soap. I do one bar that just have Olive oil, so yes you can. Here is a list of soap making oils you can look at and a link to the Olive oil soap recipe.
The top 10 Soap Making Oils
Castile Soap (Olive Oil) Recipe
Hello. That was a great article. But, how about if I add some tomato extract or papaya, do I just add it together with the essential oil? Thanks in advance.
For extracts, the general rule is to add 1 tsp of extract per lb of oils. Extracts are usually one of the last additions before pouring your soap into the mold. I have found adding them at light trace is best.