Natural Soap Colorants: Beautiful Botanical & Clay Colors for Soap
Natural colors can completely transform homemade soap. Whether I’m crafting a batch for myself or as gifts, I love using hues pulled right from nature. Not only do they look gorgeous, but they also add a wholesome touch that feels really special. If you’re new to soap making or just getting curious about ditching synthetic dyes, I’m sharing everything you need to know to get started with natural colorants for soap.
Why Use Natural Colors in Soap?
Homemade soap already feels pretty personal, but using natural colors adds another layer of care. Botanical and mineral colorants don’t just look great; they connect every bar to an earthfriendly vibe. Instead of artificial dyes, you get tones from clays, roots, flowers, and even veggies, which is great for anyone who likes to keep things more natural around the house.
A lot of people (myself included) notice that natural colorants can sometimes be gentler, especially for those with sensitive skin. Plus, there’s something super satisfying about knowing exactly what’s in your soap. Natural ingredients can fade over time, but with the right choices and a bit of practice, the results are usually beautiful and unique. One side benefit is that many natural colorants, like clays and botanical powders, also add skin-loving properties to your soap—think gentle exfoliation or extra minerals for nourishment.
How Natural Colorants Work in Soap Making
Coloring soap with natural ingredients isn’t as tricky as it sounds, but it helps to know how saponification (the soapmaking process) works. Some colorants change when mixed with oils or react to the lye, so the shade you see at the start isn’t always what you get once the soap cures. I’ve had batches come out brighter or more muted than expected, and that’s all part of the fun!
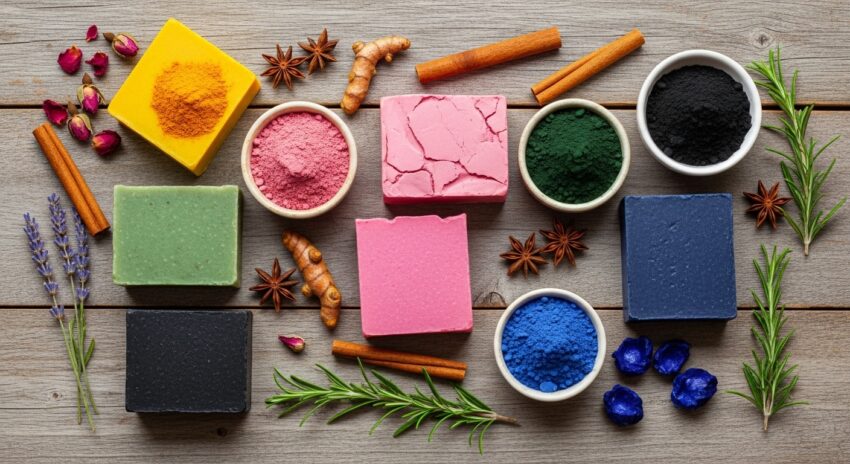
- Botanical Powders: These include things like turmeric (orangeyellow), spirulina (green), and alkanet root (purple/blue). Dried, finely ground botanicals work best since they mix well and don’t leave gritty bits. Other great picks are beet root and madder root powders, giving pinks and reds for more colorful options.
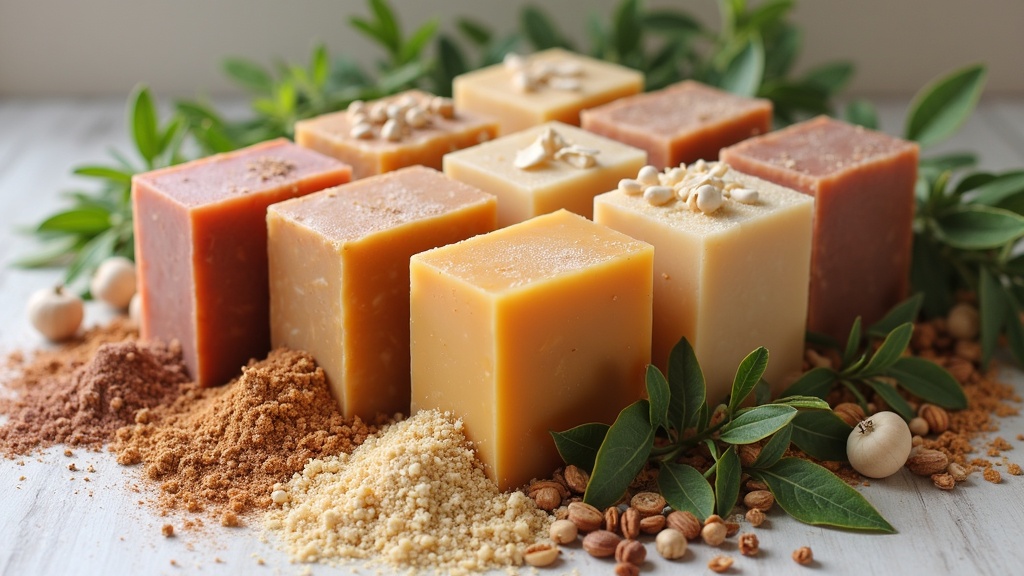
- Clays and Minerals: French green clay, rose clay, and activated charcoal are awesome for soft earthy shades. These also provide mild cleansing and can make soaps feel silky or help absorb excess oil, making your soap not just beautiful but a treat for the skin.
- Infused Oils: You can steep herbs or petals in your soap oils for subtle tints. Calendula petals, for example, create a light yellow color. You might also infuse annatto seeds or paprika for richer oranges. Longer infusion times can result in deeper, more lasting shades.
Part of the adventure with naturals is experimenting. Sometimes colors fade, and some botanicals switch up under high pH. Keeping small notes or a soapmaking journal helps track what works best. Don’t be afraid to test new ingredients, and remember that even “failures” are valuable learning moments that may surprise you with new shades and effects.
Popular Natural Colorants and How to Use Them
Certain natural colorants are super popular for good reason; they’re easy to use and the colors hold up well. Here are a few I think anyone new to natural color should try first:
- Turmeric: Gives a vibrant yelloworange, especially if used in small amounts. Too much can stain, so gentle measuring is key. It’s also a popular pick because you can find it in almost every grocery store.
- French Green or Bentonite Clay: Creates earthy green tones, adds “slip” to soap, and is gentle on skin. Clays can also make your soap feel creamy and luxurious, a bonus for anyone wanting a little extra pampering.
- Activated Charcoal: My goto for true black or deep gray, and it’s great for oily skin soaps. Charcoal also helps remove impurities, adding function as well as drama to your bars.
- Alkanet Root: When infused in oil, this root turns soap anywhere from bluegray to purple, depending on your base oils and method. Be patient—alkanet can deepen in tone as your soap cures.
- Spirulina: Delivers green, but can fade in strong sunlight or if used sparingly. I always store spirulinacolored soap away from light to help preserve the color. Try combining with French green clay to “lock in” some of the hue for a longerlasting earthy green.
- Annatto Seed: Steeping these seeds in oil provides a rich orangeyellow. The longer you infuse the seeds, the stronger the tint. This color looks gorgeous in marbled designs with uncolored or white soap.
- Indigo Powder: A popular way to get blue hues without chemicals; perfect for cool, calming soaps. Indigo works best blended with a bit of oil and added at light trace for even color.
Each colorant has its own personality, so it’s smart to test small batches first. Sometimes the same ingredient can look wildly different depending on your recipe, and that’s totally normal. This unpredictability is part of what gives natural soap its handcrafted charm!
Questions About Coloring Soap Naturally
What is the best natural dye for soap?
There’s no single “best” since it depends on your color goals. Indigo powder is pretty amazing if you want a reliable natural blue, and turmeric works wonders for yellows and oranges. Clays such as French green or rose always make things look earthy and soft. If I had to pick a starter favorite, turmeric for yellow and indigo for blue really stand out for easy, bold color. Madder root is ideal if you want a pop of pink, and activated charcoal is the classic way to get a striking dark shade.
Can you use regular food coloring in soap making?
Food coloring might seem quick and easy, but it usually doesn’t hold up well in cold process soap. The strong alkalinity can morph or fade those colors, sometimes leaving behind odd tones. For melt and pour soap, food coloring sometimes works if used in tiny amounts, but for predictability and safety, soap-specific or natural colorants work best. Overusing food coloring could even bleed or stain skin, so I always stick with products designed for skin contact.
What is the natural blue color for soap?
Indigo powder is probably the most reliable way to get natural blues in soap. It makes shades from soft denim to deep indigo blue, just depending on how much you use and your soap base. Alkanet root (oil-infused) can sometimes go blueish, especially when combined with certain oils, but indigo is my personal choice for real blue. Butterfly pea flower is another blue botanical that some soapers play with, but it sometimes turns more gray or green than true blue in soap. Experiment with all three to see which suits your project best.
How to add cool colors and sparkles to homemade soap?
Certain botanicals (like spirulina or chlorella for green, madder root for pink, paprika for coral) deliver amazing color. If you want sparkle, check that the sparkle is skin-safe; natural mica powders work well for shimmer and come in beautiful earthy metallics. For a light shimmer, I usually dust mica on the top of freshly poured soap, or swirl it in at trace for a subtle gleam. Avoid anything with big glitter chunks; they’re not skin-friendly, and microplastics aren’t a great fit for homemade or ecofriendly routines. For extra shimmer with naturals, try finely milled biodegradable glitter or dried flower petals sprinkled on top.
Step-by-Step Guide: Adding Natural Color to Soap
- Pick Your Colorant: Choose a skin-safe botanical, clay, or mineral. Double-check that it’s approved for cosmetic use. If you’re foraging your own botanicals, do a quick online search to check safety first.
- Prepare the Colorant: Powders can be blended with a splash of light oil, water, or added straight into the soap base, depending on your recipe and process (cold, hot, or melt and pour). For roots and seeds, infuse in oil by letting them steep for at least a week.
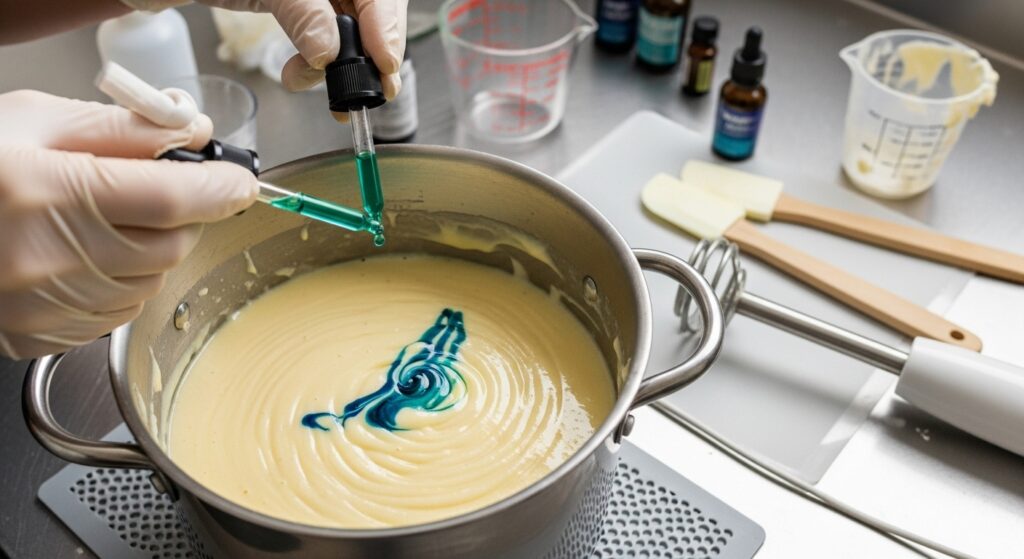
- Add at the Right Time: For cold process soap, add color at light trace. Some colorants infuse better in oils before making soap. If you’re swirling multiple colors, pour part of your soap batter into separate bowls before adding color.
- Mix Thoroughly: Make sure the color is fully blended to avoid streaks. A stick blender is handy, but be careful not to over-blend. If using powders, mix with a few spoonfuls of oil to form a paste before adding to your main batch; this makes for cleaner, streakfree distribution.
- Finish and Cure: Pour into molds as usual, then cure the soap as your recipe directs. Watch the color change as it sets—honestly, it’s fun to see how these natural tones settle over time!
Common Mistakes to Avoid (and How to Fix Them)
- Overdoing It: Too much botanical colorant (especially turmeric or spirulina) can irritate skin or make soap crumbly. I always measure carefully and err on the side of “less is more.” If you add too much, try rebatching the soap and diluting the colorant with uncolored base soap.
- Expecting Bright Primary Colors: Naturals usually produce softer, more earthy shades. If you want neon or jewel tones, you might need specialty micas or labmade colors approved for skin.
- Fade and Brown-Out: Some colorants are lightsensitive. Tucking finished soap into boxes, away from direct sun, helps retain color longer. If you notice fading, try wrapping soaps in wax paper or storing them in opaque containers.
- Clumping: Not blending powders can leave specks. Premixing powders with oil or water helps disperse colors evenly. If you see clumps after pouring, tap your mold gently to help settle and release any trapped air or unmixed colorant.
- Ingredient Variability: Natural botanicals sometimes vary from batch to batch. Even the same herb or root can look different depending on when or where it’s harvested. Keep this in mind and enjoy the slight differences as part of your handmade soap’s unique look.
Soap Projects to Try With Natural Colorants
- Layered Color Bars: Pour alternating layers of different colored soap for a pretty stripe effect. Just let each layer thicken a bit before pouring the next. Vary your natural colorants for a beautiful, earthy rainbow.
- Botanical Swirls: Mix a small batch of natural colorant and swirl it through a white or uncolored batch for a delicate pattern. Use a skewer or thin spatula to twist the colors together for a marble look.
- Shimmery Tops: After pouring, dust the surface with skinsafe mica powder for extra shimmer. This is a great way to add a special touch to gifts or market soaps. You can also sprinkle dried flower petals or citrus zest for bonus color and aroma.
- Seasonal Designs: Match your natural color palette to the season—try pumpkin puree for autumn, spirulina and gold mica for Spring, or rose clay for a Valentine’s treat.
Experimenting with simple shapes and a few botanicals is a nice way to build confidence. Even when something doesn’t turn out as expected, the soaps still work and often look unique. Encourage your creative side by blending two or three colors for ombre effects, or try embedding botanicals like whole calendula petals or lavender buds for added visual appeal.
Quick FAQ: Natural Soap Coloring
Q: Are there natural colorants that double as exfoliants?
A: Yep! Poppy seeds, ground oatmeal, and coffee grounds add gentle exfoliation and subtle color at the same time. You can also use dried lavender buds, cornmeal, or ground walnut shells for different textures and tints.
Q: How much colorant should I use?
A: It really varies by ingredient. For most botanical powders, start with 1 teaspoon per pound of soap oils, then adjust after seeing how your test batches look. Some colors are more intense than others, so it’s always better to start light and build up. Always check if anyone using your soap has sensitivities before adding higher amounts of botanicals.
Q: Will the natural color last?
A: Some botanicals fade faster than others. Claybased colors usually have better staying power. Storing soaps away from direct sunlight helps keep colors vibrant longer. If you’re gifting soaps, include a little card with care tips for the best appearance and shelf life.
Final Thoughts on Going Natural
Natural colors bring personality and earthiness to homemade soap. No two batches are exactly the same, and that’s what makes it fun. Spend some time experimenting with botanicals, minerals, and even sparkly micas for unique, eyecatching bars. Try out the colorants that catch your eye, and don’t stress if the first few bars look different than what you imagined; that’s just part of the creative process! By trusting your instincts, journaling your results, and exploring new natural ingredients, you’ll quickly build a collection of soaps that are as beautiful as they are nourishing—each one perfectly reflecting your creative touch and love for handcrafted things.
Properties of Soap Making Oils
Trending Natural Soap Ingredients 2025
Important Note:
This information is for educational purposes only.
This post may contain affiliate links. If you make a purchase through these links, I may earn a small commission at no extra cost to you.
Updated Nov 2025
© 2025 – 2026, admin. All rights reserved.
his is such a fantastic and comprehensive guide! I love how you not only list the natural colorants but also explain the science behind the color shifts, knowing that spirulina might morph to blue-green or that alkanet can give anything from grey to purple is a game-changer for planning a batch. Your practical tips on using infusions versus powders to control intensity have solved the muddy results I’ve gotten in the past. This is exactly the kind of clear, experienced-based resource that makes natural soap making so much less intimidating!
I love the idea of colouring soap naturally. It feels like such a beautiful way to connect creativity with nature. Reading this makes me appreciate how much thought goes into handcrafted soap, from the ingredients to the colours themselves. I didn’t realise natural clays and botanicals could make such lovely shades.
Do you find that certain natural colourants hold their vibrancy better than others over time?
Thanks so much. Clays and mineral oxides (like French green, rose clay, or kaolin) tend to remain stable, while more delicate botanical colorants such as spirulina, beetroot, or alkanet root can fade graduallyFor the best results, I always suggest storing bars in a cool, dark place to preserve their natural shades and keep those beautiful hues vibrant
I’ve been curious about making soap with natural ingredients, and the section on botanical and clay colorants really caught my attention. I love the idea that turmeric, spirulina, or even French green clay can add both beautiful earthy tones and skin-loving benefits at the same time. It makes the whole process feel more creative and wholesome compared to synthetic dyes.
I’m especially intrigued by how some colors can change or fade during curing, like spirulina turning softer over time. Do you find that clays generally hold their color better than botanicals, or is it more about how the soap is stored after curing?
Hi Alice, thanks for the comment. I make a few different soaps with clays and I find that the color holds up well.