If you’re just getting started making soap, you’re probably discovering that there is a lot more to it than simply mixing a few ingredients together.
I remember making my first batch and feeling completely overwhelmed. There were questions about lye, oils, curing times, fragrances, temperatures, and what seemed like endless conflicting advice online.
The good news is that most beginner soap makers ask the exact same questions.
Whether you’re making soap for yourself, your family, gifts, or eventually hoping to sell it, understanding the answers to these common questions will save you time, money, and frustration.
Let’s look at the 10 questions nearly every new soap maker asks.
If you’re completely new to soap making, you may also find these beginner guides helpful:
• Best Oils for Soap Making
• Soap Making Supplies for Beginners
• What Is Trace in Soap Making?
• How to Use a Lye Calculator
• How Long Should Homemade Soap Cure?
• Cold Process vs Melt and Pour Soap
These articles cover many of the skills and concepts you’ll encounter as you begin making your first batches.
Can You Make Soap Without Lye?
This is by far the most common question new soap makers ask.
The short answer is no.
All real soap requires lye. Whether you’re making cold process soap, hot process soap, or commercial soap, lye is an essential part of the soap-making process.
When oils and lye combine, they go through a chemical reaction called saponification. This reaction transforms the oils and lye into soap and naturally occurring glycerin.
Without lye, soap simply cannot be made.
Many beginners become confused because melt-and-pour soap bases don’t require handling lye. However, lye was still used during the manufacturing process before the soap base reached the store.
If you’d like a deeper explanation, be sure to read my article Can You Make Soap Without Lye? where I explain the science behind soap making and clear up some of the biggest misconceptions beginners have.
Before working with lye, I strongly recommend investing in a pair of chemical-resistant gloves, protective safety goggles, and a digital thermometer. Proper safety equipment is inexpensive compared to the cost of a chemical burn and can make the entire soap-making process much safer and less stressful for beginners.
Is Lye Still in Homemade Soap?
Another question I hear regularly is whether finished soap still contains lye.
When a recipe is properly formulated and allowed to complete saponification, there should be no free lye remaining in the finished bar.
The lye is consumed during the soap-making process.
This is one reason why properly made handmade soap can be so gentle on the skin.
Problems generally occur when:
- Ingredients are measured incorrectly
- Recipes are improperly formulated
- Oils are substituted without recalculating
- Soap batter isn’t fully mixed
One of the easiest ways to avoid these issues is by learning how to properly calculate your recipes. My guide on How to Use a Lye Calculator for Soap Making walks you through the entire process step-by-step.
What Oils Are Best for Soap Making?
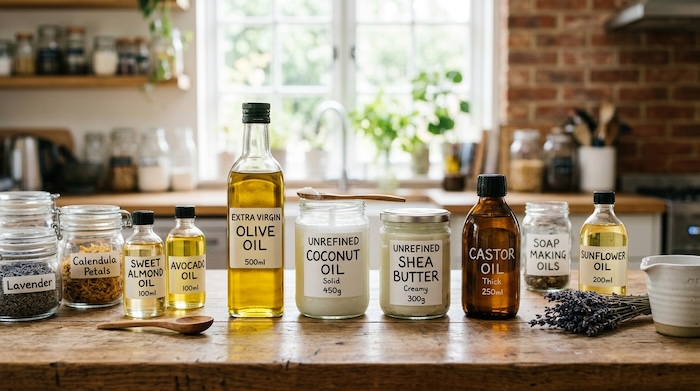
There is no single best oil for soap making.
Most soap recipes use a blend of oils because each oil contributes different qualities to the finished bar.
Some oils create hardness, others improve lather, while some add moisturizing and conditioning properties.
Popular soap-making oils include:
| Oil | Main Benefit |
|---|---|
| Olive Oil | Gentle and conditioning |
| Coconut Oil | Cleansing and bubbly lather |
| Palm Oil | Hardness and longevity |
| Shea Butter | Creamy conditioning lather |
| Castor Oil | Lather booster |
| Avocado Oil | Moisturizing properties |
If you’re unsure which oils to purchase first, my article on Best Oils for Soap Making explains the advantages and disadvantages of the most commonly used oils.
You’ll also find my guide to Soap Making Oil Properties helpful if you want to understand how hardness, cleansing ability, conditioning, and lather are affected by different oils.
A digital kitchen scale is one of the most important tools you’ll purchase as a soap maker. Because soap recipes are based on precise measurements, even small weighing errors can affect the outcome of your batch. I always recommend choosing a scale that measures in both grams and ounces for maximum flexibility
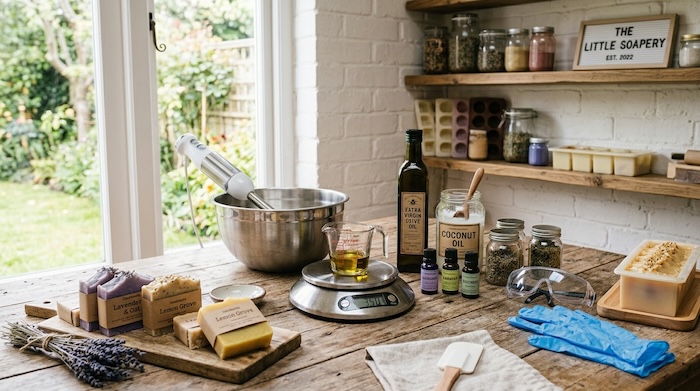
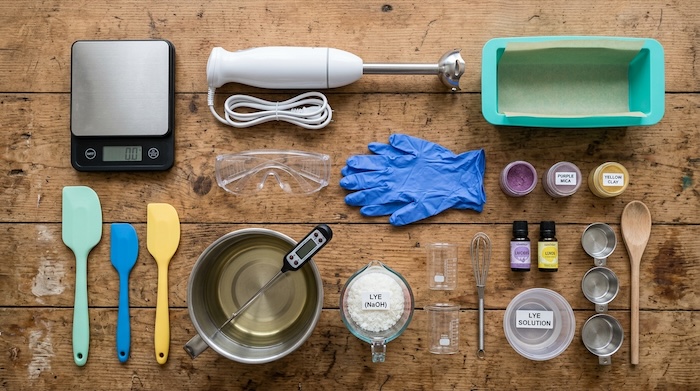
What Equipment Do I Need to Make Soap?
Fortunately, you don’t need a large investment to get started.
Most beginners can make excellent soap using a few basic tools.
Essential soap-making equipment includes:
- Digital scale
- Stick blender
- Stainless steel pot
- Heat-safe containers
- Silicone spatulas
- Soap mold
- Safety goggles
- Gloves
- Thermometer
Many of these items may already be sitting in your kitchen.
If you’re building your first soap-making setup, my complete guide to Soap Making Supplies for Beginners covers everything you’ll need and helps you avoid purchasing unnecessary equipment.
If there is one tool that makes soap making easier, it’s a quality stick blender While soap can technically be mixed by hand, a stick blender dramatically reduces mixing time and helps achieve a stable emulsion much faster. Most soap makers consider it an essential piece of equipment.
What Is Trace in Soap Making?
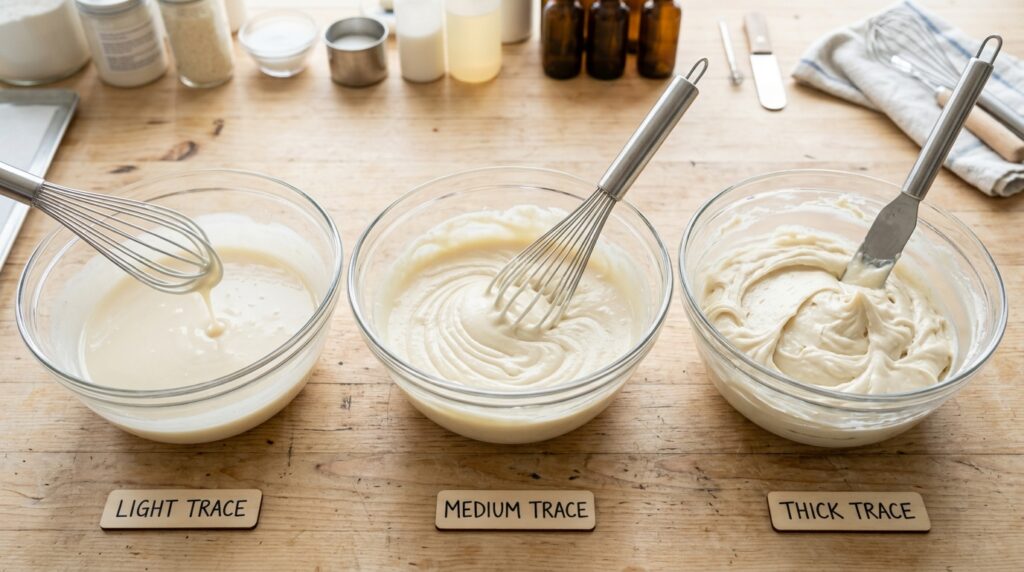
Trace is one of the first soap-making terms that confuses beginners.
Trace occurs when the oils and lye solution have emulsified and the soap batter begins to thicken.
Think of it as the stage where your soap batter starts changing from a thin liquid into something that resembles pudding.
There are three common stages:
Light Trace
Thin and fluid.
Perfect for intricate swirls and detailed designs.
Medium Trace
Similar to thin pudding.
Ideal for most beginner recipes.
Thick Trace
Very thick batter.
Great for textured tops and rustic-looking bars.
Learning to recognize trace is one of the biggest milestones for new soap makers.
If you’re unsure what trace actually looks like, my article What Is Trace in Soap Making? includes examples and explanations that make it much easier to identify.
How Do I Use a Lye Calculator?
Every oil requires a different amount of lye.
Because of this, you should never substitute oils in a recipe without recalculating the lye amount.
A lye calculator helps determine:
- Lye amount
- Water amount
- Superfat percentage
- Recipe balance
At first, lye calculators can seem intimidating, but after a few batches they become second nature.
If you’ve never used one before, my complete tutorial on How to Use a Lye Calculator walks beginners through the process using real examples.
Why Did My Soap Fail?
Every soap maker eventually experiences a batch that doesn’t turn out as expected.
The good news is that most soap problems have simple explanations.
Some of the most common issues include:
Soap Seized
Often caused by certain fragrance oils, essential oils, or high temperatures.
Soap Separated
Usually caused by incomplete mixing or false trace.
Soft Soap
Can result from excess water, insufficient curing time, or recipe formulation issues.
Cracking
Often caused by overheating during saponification.
Soda Ash
A harmless white powder that sometimes forms on the surface of soap.
If you’ve ever wondered what went wrong with a batch, my Soap Making Troubleshooting Guide covers the most common soap making problems and how to fix them.
How Long Does Homemade Soap Need to Cure?
One of the most misunderstood parts of soap making is curing.
Many beginners think soap is ready to use as soon as it becomes hard enough to remove from the mold.
While technically it may be safe, curing allows excess water to evaporate and significantly improves the quality of the finished soap.
Proper curing improves:
- Hardness
- Longevity
- Lather
- Mildness
General curing recommendations include:
Soap TypeCure TimeCold Process4–6 WeeksCastile Soap6–12 MonthsHot Process2–4 WeeksMelt and PourNo Cure Required
If you’d like a more detailed explanation of curing and why patience pays off, read How Long Should Homemade Soap Cure?
Can I Use Essential Oils in Soap?
Yes, and many soap makers prefer essential oils over synthetic fragrances.
However, not all essential oils perform equally well in soap.
Some fade quickly while others remain strong for months.
Popular choices include:
- Lavender
- Peppermint
- Lemongrass
- Litsea Cubeba
- Cedarwood
- Tea Tree
- Orange (when anchored properly)
If you’re trying to choose scents for your first batches, my guide to the Best Essential Oils for Soap Making covers the oils that consistently perform well in cold process soap.
Before using any essential oil, I also recommend reading Essential Oil Safety for Soap Makers, especially if you make products for babies, children, or individuals with sensitive skin.
When purchasing essential oils, I recommend starting with a few versatile favorites such as lavender, peppermint, tea tree, and lemongrass. A good essential oil reference guide can help you understand usage rates, blending options, and important safety considerations before adding them to your recipes.
Should I Start with Cold Process or Melt and Pour Soap?
Both methods have advantages.
Cold Process Soap
Pros:
- Complete ingredient control
- Endless recipe possibilities
- Traditional soap-making experience
Cons:
- Requires handling lye
- Requires curing time
Melt and Pour Soap
Pros:
- Beginner friendly
- No lye handling
- Immediate results
Cons:
- Less control over ingredients
- Limited customization
For people who want to learn true soap making from the ground up, I generally recommend starting with cold process soap and a simple beginner recipe.
Frequently Asked Questions
What is the easiest soap for beginners to make?
A simple cold process recipe containing olive oil, coconut oil, and a hard oil such as palm oil is often the easiest place to start. These recipes are forgiving and help beginners learn the basics.
How much does it cost to start making soap?
Most beginners can get started for less than the cost of a few commercial soap-making kits if they already own basic kitchen equipment. The biggest expenses are usually oils, lye, safety gear, and a mold.
Can I use kitchen equipment for soap making?
Many soap makers dedicate specific equipment to soap making and do not use it for food preparation afterward. This helps prevent contamination and simplifies cleanup.
Why is my soap still soft after a week?
Soft soap can be caused by excess water, a high percentage of soft oils, inaccurate measurements, or simply insufficient curing time.
Is homemade soap better for sensitive skin?
Many people with sensitive skin prefer handmade soap because it often contains fewer synthetic ingredients and naturally retains glycerin produced during saponification.
How long does homemade soap last?
Most properly cured bars will remain usable for at least one year, while some recipes can last significantly longer when stored in a cool, dry location.
Final Thoughts
Every experienced soap maker started exactly where you are now.
The questions you’re asking today are the same questions almost every soap maker asks when they begin. The key is learning one step at a time, practicing regularly, and understanding that mistakes are simply part of the learning process.
Soap making combines science, creativity, and patience. Once you understand the basics, your confidence grows quickly.
Before long, you’ll be answering these same beginner questions for someone else.
Disclosure:
The information provided on this website is for educational purposes only and should not be considered professional advice. Always practice proper safety when making soap or skincare products.
This post may contain affiliate links. As an Amazon Associate, I earn from qualifying purchases at no additional cost to you.
© 2026, admin. All rights reserved.